 |
|
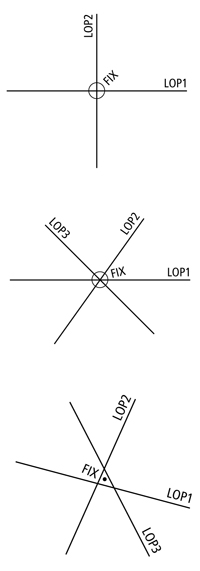
Top, any two LOPs crossing can give us a fix position. Middle, for more confidence in our fix, we can use more LOPs. This is the classic “pinwheel” fix. Bottom, when the LOPs don’t all cross at a point, we have a “cocked hat” fix. Place the fix position in the center of the enclosed area. |
Editor’s note: We’re revisiting this series on navigating by the sun, moon, planets and stars in the age of GPS because celestial nav is not only a viable backup to satellite navigation, but it is also a skill that ocean voyagers should have in their toolkit. In this series, we’ll cover all the basic knowledge you’ll require to get up to speed on this elegant and rewarding technique for finding your way at sea. Click to read Part 1, Part 2, Part 3, Part 4, Part 5, Part 6, Part 7, Part 8, Part 9, Part 10, Part 11 and Part 12.
In this installment, we’ll explore the value of shooting multiple celestial bodies and getting a fix position that nails down our exact position.
Up to this point in our celestial navigation series, we’ve learned about taking sights of all the various celestial bodies: the sun, the four navigational planets, the 57 navigational stars (plus latitude from Polaris) and, in our last segment, the moon. We haven’t focused much, however, on shooting sights of multiple bodies. These can all be stars; or planets and stars; or the moon, planets and stars; or even, infrequently, the sun and moon during the day.
As we know from previous installments of this series, taking a sight of any one celestial body produces only a single line of position (LOP). We know we’re somewhere on that LOP, but we can’t say for certain exactly where.
We can obtain LOPs at different times of the day and advance an LOP to create something called a running fix. That gives us a better idea of where we are than a single LOP, but it has its drawbacks too. A running fix is subject to the effects of set and drift on our dead reckoning track during the time when we advanced the sight.
What we’d like is a fix position. When you have a fix, you know your exact location on the ocean. When navigating with celestial, there is only one way to get a fix position: by taking sights of multiple celestial bodies at once. Obviously, you can’t take multiple sights all precisely at the same instant. You’re taking a series of sights within one sight-taking window of 15 or 20 minutes. Since most voyaging sailboats are not going fast enough to cover a significant distance in that time frame, even at maximum speed (and you might be becalmed or in light winds), we can treat the sights taken in this sight-taking window as essentially simultaneous for practical purposes.
So, why limit ourselves to two sight-taking windows? Why not take multiple sights all day long and garner a fix position whenever we like? The answer, as regular readers of this series already know, is that in order to shoot a sight of a star or planet, we need the sky to be dark enough so that we can see the celestial body in question. Yet we also need enough light in the sky to illuminate the horizon, since we need a visible horizon in order to take sextant sights. The only two times during the course of each 24 hours when we have these conditions are at morning and evening twilight.
In the morning just before the sun rises above the horizon, there is enough light to delineate the horizon, but the sky still shows the brighter stars and planets. In the evening, just after the sun has set, the stars and planets start to appear in the sky, but the horizon is still useful.
The way the stars and planets appear and the way the horizon disappears is important for your sight taking. During morning twilight, for example, the horizon is defined by the rising sun’s light in the east first. And because the light from the sun is brightening the eastern sky first, the stars and planets in the east will disappear in the glare of the sun first. So when you have your list of celestial bodies that you’ve precalculated (more on that later), you want to shoot the stars and planets in the east first. Then, work your way around to the western bodies. The same is true in the evening. We want to start shooting in the east first, because after the sun sets in the west, the bodies in the eastern sky will start to show first as the sky darkens. Plus, the eastern horizon is going to disappear first, while there will still be some light in the west to define the western horizon.
 |
|
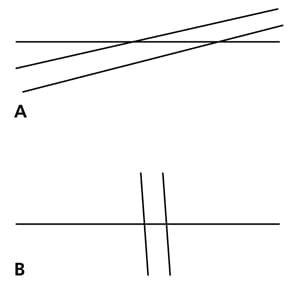
A narrow crossing angle between two LOPs should be avoided whenever possible. A relatively small error in the sight (as in Figure A) will produce a large change in position. By contrast, with a large crossing angle, the same mistake will result in a much smaller change in position. For two LOPs, 90° is the ideal crossing angle. For three bodies, 120° would be best. Remember that a reciprocal bearing is as bad as the same bearing. |
One great thing about taking sights of the sun, other than the fact that it’s so easy to see, is that you have all the time you need — no pressure. The sun stays in the sky for hours, and you’re only shooting one body. When taking sights of multiple bodies at morning or evening twilight, however, there is more to do: You have to find the body, shoot it and then move on to the next body. This isn’t to imply that you’re under tremendous stress or that the task is incredibly difficult, but there are ways of making the process easier. One is to limit the number of bodies you shoot. Two LOPs that cross at right angles is a fix — so, just shoot two bodies. As you get better at the process, you can add another body and then another. Some very good celestial navigators will shoot five bodies during a session and end up with multiple LOPs that cross in what’s called a pinwheel fix. That does require a bit of practice, however.
Another way to make the process easier is by doing some preplanning, or what’s called precalculation. We’ve covered this earlier in the series when talking about stars. There are tools like the Rude Star Finder or smartphone apps that allow us to precalculate the azimuth and altitude of a large number of stars and the planets and the moon for our time of twilight and our latitude. We can make up an extensive list of bodies to shoot and have a great idea of what we will want to shoot.
A second, even easier method of precalculation for stars is to use Vol. 1 of HO 249. (This method only works for stars, not the planets or the moon.) We covered the Vol. 1 method in our installment on star sights (for a refresher, see accompanying sidebar).
Once we’ve completed our precalculation of the bodies available for morning and evening twilight, we make a list. In both cases of morning and evening twilight, we want to start shooting bodies in the east first, so we arrange our list by putting those bodies with easterly azimuths at the top.
To make taking the sights at twilight easier, it’s a great idea to enlist a helper from the crew. We use the sextant to bring the body to the horizon, swing the arc, and when we’ve got our sight we call out “mark.” Our helper then records the time (seconds first, then minutes and hours) and writes down the raw sextant angle as we read it off to them.
Two other ways to make the sight taking easier are to make use of our list of precalculated bodies by setting our sextant to the altitude of the body, and then looking through the sextant in the direction or azimuth given in our list. The body in question will be in our field of view just above or below the horizon. We then merely have to adjust the sextant’s micrometer drum to bring the body to the horizon and get our sight.
Another way to ease taking sights of stars and planets is to use the upside-down sextant method. Zero out the index arm and the micrometer drum, flip the sextant upside-down, and look through the sextant telescope at the star or planet we want to shoot. Then we release the index arm and bring the horizon up into our field of view. Finally, we flip the sextant over, look out at the horizon and make our fine adjustment with the micrometer drum. This method eases the process by allowing us to keep the sextant aimed at the small star or planet and bringing the big, wide horizon up to it — rather than the more challenging task of bringing the small point of light down to the horizon.
When shooting multiple bodies, it’s important to take into account the azimuth or bearing of the bodies. We don’t want to shoot a star at an azimuth of, say, 081° and a planet at an azimuth of 097°. Those two LOPs will cross at a shallow angle. This means that any error in the sight can greatly influence the crossing point of the two LOPs, and therefore the fix. If we’re shooting two bodies for a fix, we want them to be separated in azimuth by 90°. If we’re shooting three, we’ll want them separated in azimuth by roughly 45°. Once we get to shooting and reducing five bodies or more, the difference in bearing isn’t quite so numerically important; we simply want them to be spread out around the sky.
HO 249 Vol. 1 also makes it easy to choose three stars with the best cut. Those stars are marked with black diamonds. So if we’re only going to shoot three stars, those are the ones that will give us the best cut to our fix.
Plotting the LOPs for a multiple-body fix can be challenging because we end up with lots of lines in a small area of our plotting sheet. This is where it’s important to make the smallest of marks for your assumed position (AP) and to draw the azimuth line to the body in the lightest possible dashed line. The AP and the azimuth line are only used to find the LOP; they have no further navigational value after that. Once we get our LOP, then we can bear down a bit on our pencil and draw a heavy line.
When we shoot several bodies and we get a number of LOPs, the place where they all cross is our fix position. In the best of all worlds, all our LOPs cross at exactly the same place and we get a perfect pinwheel. Often, however, we’ll get a few LOPs that don’t cross at a precise point, but cross in a way that encloses a small area. This area is called a “cocked hat” (another name for the tricorn hats popular in colonial times). When we have a cocked hat-type fix, the best approach is to place our fix position in the middle of it.
And since it is a fix position we’ve just found, we can start a new DR track from that spot. We’ve just nailed down our position very accurately with our multiple-body fix, and we can carry on with our dead reckoning navigation with great confidence.