Editor’s note: We’re revisiting this series on navigating by the sun, moon, planets and stars in the age of GPS because celestial nav is not only a viable backup to satellite navigation, but it is also a skill that ocean voyagers should have in their toolkit. In this series, we’ll cover all the basic knowledge you’ll require to get up to speed on this elegant and rewarding technique for finding your way at sea. Click to read Part 1, Part 2, Part 3 and Part 4.
In this installment, we’ll cover sextants and sight taking, and the corrections you’ll need to apply to your sight.
So far in this series, we have discussed a variety of terms and concepts, but we haven’t talked much about either the process of taking a sight or the instrument we use to do so. In this installment, however, we focus on the sextant, the method employed to use it properly and the various corrections we need to apply so that our sight accurately measures the angle of the celestial body above the horizon. Before you take the sight, there are a few preparation steps that will make the final result easier and better.
First of all, set up a system for recording your sight data. A steno pad or clipboard works well. If possible, recruit an assistant to note the time and record the angles of your sights.
Second, find a secure place to take your sight from so that you can brace yourself and still have both hands free for the sextant. Make sure that you are as high as is safe (assuming you are on a sailboat). This will increase the time that you are able to see the horizon over intermediate waves.
Third, determine your sextant’s index error (see sidebar for how to do this technique).
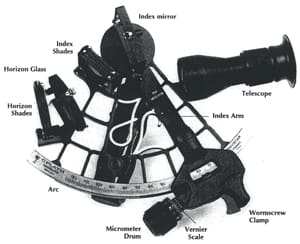
Fourth, and most important for the sun, make sure that you have sufficient shades in front of both the index mirror and the horizon glass. This is critical; there is no reason to ruin your eyes taking sights. If you are unfamiliar with a sextant, the easiest way to determine the proper shades is to flip them all the way to the side so that you can look through them directly at the sun. You should not be able to see the sun through all of them. Next, remove shades starting with the most translucent first. Find the combination that allows you to see the sun reasonably well but that doesn’t hurt your eyes. When you have the correct combination, the sun should appear as a dim disk.
 |
|
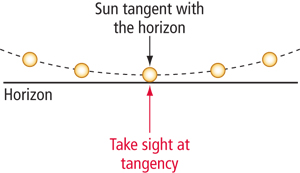
In order to ensure that you are bringing the sun directly down to the horizon, the navigator needs to “swing the arc.” This means gently rocking the sextant back and forth. As you do this, the sun will appear to describe an arc in the sky. The sight is taken when the sun is at the lowest point of its arc and rests on the horizon. |
Now that you are ready to take the sight, set the index arm to 0° and the micrometer drum so that the index error is negated. Aim the sextant up at the sun and you should see two images in the eyepiece. Squeeze the worm screw clamps together to release the index arm from the arc and slowly slide the index arm forward, following the sun image that goes down by tilting the sextant forward. When you get the sun near the horizon, release the clamps. Now, remove the shades from in front of the horizon glass (you may leave one if there is a large amount of glare on the water).
Now comes the precision work. Using the micrometer drum (the knob with the minutes etched on it), bring the sun down so that it just rests on the horizon. It is important that the sun be on the part of the horizon directly under the sun. To ensure this, you must “swing the arc.” This is done by rocking the sextant slowly from side to side. One way to think of this is to imagine there is an axle passing through the telescope and the horizon glass, and you are rotating the sextant around that axle. The sun will rise from the horizon and then as you change direction it will dip, describing an arc as illustrated in the diagram above. You need to have the sun on the horizon right at the bottom of this arc. Now get the time of your sight.
Precise timing of the sight is important. Even if you are only four seconds off, the result could be an error of a mile. It usually makes sense to take at least three sights of the sun so that you can plot all three and make sure that your sights are consistent (and therefore probably good). Some navigators always take five, others just take one.
Sight correction
After taking the sight, the first step in turning that sight into a Line of Position (LOP) is to correct the sight. The sextant angle, which is called “Hs,” commonly needs three corrections for a sun sight: index error, height of eye (also called dip) and the apparent altitude correction (the main sun correction, or “Ha”).
These corrections are necessary to eliminate all the errors that creep into the real world. All sight reduction tables are based on a highly theoretical model, and we must adjust our sight to conform to that.
There are two rarely used corrections that might crop up. Instrument error exists in some older metal sextants. (Current metal sextant manufacturers supply a card that lists the “error” in their sextants. This is always negligible.) Instrument error remains constant for a specific section of the sextant’s arc. It is described, generally, as positive or negative. If the error is positive, then the correction is subtracted.
 |
 |
|
|
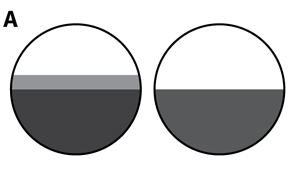
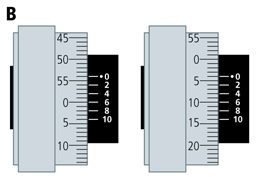
Determining the sextant’s index error: Begin by setting the sextant’s index arm to 0° and the micrometer drum to 0’. Next, look out at the horizon through the eyepiece. You’ll probably see two horizons as shown at the left in Figure A. If not, turn the micrometer drum slightly and the single horizon should separate into two horizons. Now adjust the micrometer drum so that the horizons merge into one, as depicted on the right in Figure A. Index error is labeled “on the arc” or “off the arc.” Figure B shows two micrometer drums; to the left, the index error is 6’ off the arc. It is “off” because it is really 6’ Iess than 0° 0’. In other words, it is negative 6’, although the drum reads 54’. To the right in Figure B, the index error is 4’ on the arc. In both cases, the pointer on the index arm would be essentially 0°. |
||
While instrument error is fairly precisely defined for the navigator, personal error is not. Personal error is the navigator’s estimation of a consistent error in his sights. This can usually only be determined by a seasoned celestial navigator after analyzing many sights.
A far more common error that you’ll be dealing with every time you take sights is index error. It’s good practice to determine your sextant’s index error every time that you go on deck to take sights. Index error is just the measurement of the difference between the index mirror and the horizon mirror. With the sextant set at 0° 00.0’, these should be parallel. (The process for determining index error is shown in the graphic above.) If the error is on the arc, it should be subtracted from Hs; if the error is off the arc, it should be added to Hs. Remember, each minute of index error not accounted for is a full mile in the accuracy of the final sight that your LOP will be inaccurate. In plastic sextants, the index error may change significantly during the time that you are taking sights. This usually occurs if there is a large temperature differential between where the sextant is stored and on deck. It may be worthwhile to determine the index error a second time on a hot day or a particularly cool morning.
 |
|
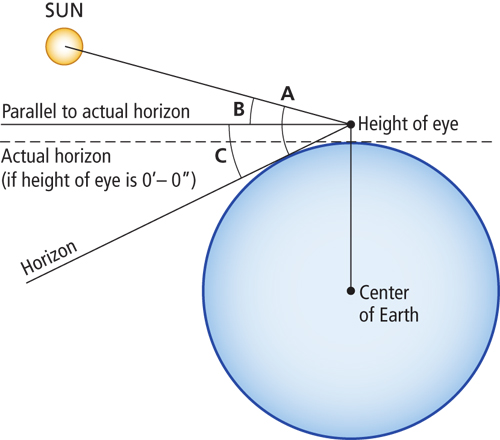
The dip table corrects for the distance of the observer’s height of eye above the sea. Here, A is the Hs measured at a certain height of eye; C is the difference between this angle and the Hs with no height of eye; and B is Hs corrected for dip. |
The next error to correct for is height of eye. The tables all assume a height of eye of exactly 0 feet. That is because then the horizon is at a 90° angle to the zenith. The diagram above shows an exaggerated picture of the change in the Hs based on the change of the height of eye. Your height of eye is your sextant’s distance above water level at the time of the sight. To determine the correction for height of eye, use the “dip” table on the inside front cover of the Nautical Almanac. Notice that the dip correction is always negative. The dip table is a critical table — this means that you must find two numbers that bracket your height of eye. For example, if our height of eye is 10 feet, we would go down the column labeled “ft.” (on the right side of the table) until we found a number larger than 10 (here it’s 10.5). Now, move to the left and there is the correction placed midway between 9.8 and 10.5. All of the values from 9.9 to 10.5 inclusive have the same correction, -3.1’ in this case. The critical table saves a lot of time because there is never a reason to interpolate.
 |
|
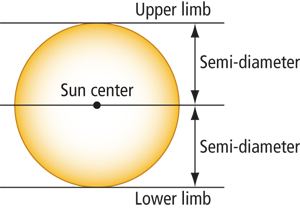
Semi-diameter: Because navigators take a sight on the upper or lower limb of the sun, we need to correct for the difference between the center of the sun and its edge. This is the semi-diameter correction. |
The main sun correction is found on the same page as the dip table in the Nautical Almanac. It is also called the apparent altitude correction because it must be entered with the apparent altitude of the sun. This table is a critical table like the dip table. It is entered with the apparent altitude, which is Hs corrected for index error and dip. The correction is then applied to the apparent altitude to give Ho, the observed altitude — a fully corrected sight.
This main sun correction is really three separate corrections rolled into one. This cuts down the amount of work required to correct a sight. The largest correction is for the radius of the sun (called semi-diameter in the Nautical Almanac). There are two columns of corrections: one for the sun’s lower limb (the bottom of the sun) and one for the upper limb (the sun’s top). Because navigators most commonly shoot the sun’s lower limb, it is in bigger type than the correction for the upper limb. You’ll notice that there are two separate columns for the main sun correction. These are determined by the month of the year that you take the sight. In the Northern Hemisphere winter, we are closer to the sun in our orbit and therefore the sun’s semi-diameter component of the correction is larger. In the summer, we are further away and the semi-diameter is smaller.
 |
|
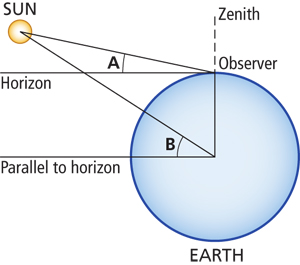
Horizontal parallax: Theoretically, the angle to the sun from the Earth is measured from the center of the Earth to the center of the sun. Because we are actually not on this line, A is slightly different from B. |
The second correction is the correction for horizontal parallax. This adjusts for the fact that we are not standing exactly between the center of the Earth and the center of the sun when we take our sight. The exaggerated difference in this angle is shown in the diagram at left. This is a fairly small correction.
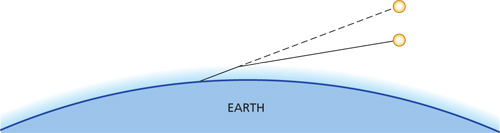
Third is the correction for refraction. As the light from the sun enters the Earth’s atmosphere, it is bent downward. This has the effect of making the sun seem higher in the sky than it really is. The effect is greatest when the sun is lower on the horizon because the light has the longest layer of atmosphere to penetrate. There are special correction tables on page A3 of the Nautical Almanac for sights of less than 10° apparent altitude when the refraction is the most influential. Many navigators don’t use low-altitude sights because atmospheric conditions can affect the refraction and the accuracy of the correction.
There is yet another table for correcting sights when faced with extremes of air pressure and temperature. This is on A4, the third yellow page in the Nautical Almanac. Again, the most pronounced effect is on sights with a low apparent altitude.
 |
|
Refraction: As light from the sun enters the atmosphere, the change in density causes the light rays to bend, much the same way a pencil appears bent when put in a glass of water. This bending is greater when the sun is low and its light passes through a thicker slice of atmosphere. |