
Editor’s note: We’re revisiting this series on navigating by the sun, moon, planets and stars in the age of GPS because celestial nav is not only a viable backup to satellite navigation, but it is also a skill that ocean voyagers should have in their toolkit. In this series, we’ll cover all the basic knowledge you’ll require to get up to speed on this elegant and rewarding technique for finding your way at sea. Click to read Part 1, Part 2 and Part 3.
In this installment, we’ll cover Local Hour Angle (LHA), and determining assumed longitude and assumed latitude. We’ll also look at the spherical trigonometric process for doing sight reduction.
In part three of this series on celestial navigation, we discussed the celestial sphere, the navigational triangle, Greenwich Hour Angle (GHA) and declination. GHA and declination are the coordinates we use to locate celestial bodies on the celestial sphere. These two measurements are analogous to the coordinate system we use on Earth to locate positions: longitude and latitude. It’s lat/long, of course, that describes our DR position, for example. Similarly, using the GHA and declination coordinate system, you can find the position of a celestial body on the celestial sphere. That’s why these celestial sphere coordinates are important in our study of celestial navigation.
You might notice that so far we’ve discussed a coordinate system to locate celestial bodies on the celestial sphere, and we’ve mentioned the lat/long system we use for positions on Earth like our DR position. Those two coordinate systems describe different things, though. How are we going to bring them together and get the celestial system to tell something about our position?
The way we start bringing them together is with a new type of “hour angle.” (These measurements are called hour angles because when it comes to celestial bodies, there is a direct relationship between time and arc — i.e., the sun moves through 15° every hour — more on this later in the series.) This hour angle, called Local Hour Angle or LHA, describes the angle between where we are, based on our dead-reckoned longitude, and the sun or other celestial body.
Measured westward
LHA is measured westward (and only to the west!). We start at the observer’s DR longitude and then go west until we reach the GHA of the sun. That angle, between our longitude and the celestial body’s GHA is what constitutes the LHA of the celestial body. So, given that the angle is measured to the west, we can see that if the sun, for example, was to the west of us in the afternoon, it would have a small LHA value. If the sun was to the east of us in the morning, we would have to measure from our longitude all the way around the back of the Earth to reach the sun’s GHA, and thus we would have a large LHA value.
We need LHA so we can enter the HO 249 sight reduction tables. The reason for this is that LHA is an important part of the celestial triangle. LHA is the angle at the top of the navigational triangle; as such, LHA must be determined for virtually every sight reduction.
 |
 |
|
|
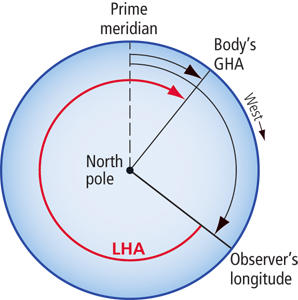
The sun is to the east of the observer, as it would be in the morning. Here the LHA is fairly large, being measured almost all of the way around the Earth. LHA is always measured west from the meridian of longitude to the GHA. It does not matter if this results in a larger angle, as shown here. The situation for the sun will be the same every morning, with the sun’s LHA fairly large and increasing to 360º at noon. |
||
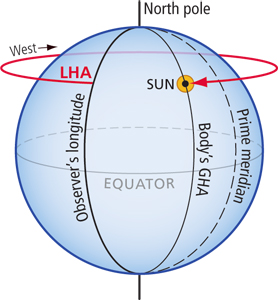
To understand LHA, imagine yourself looking down on the North Celestial Pole (as pictured above). In this case, the sun is to the east of the observer’s position. LHA is always measured westward from the observer’s meridian of longitude. In this case of measuring LHA, we have to go most of the way around the Earth to get to the GHA of the sun.
The same positioning is shown on the left in a side view of the celestial sphere. In this view, with the angle arrow disappearing behind the Earth, it’s clear that the LHA is going to be a fairly large number.
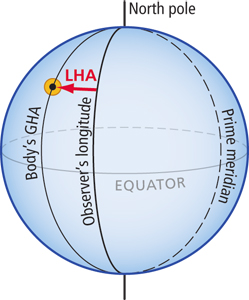
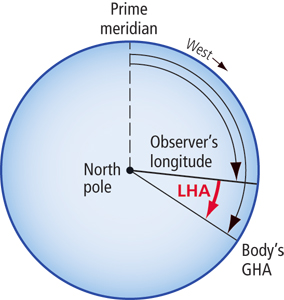
Also included here are two diagrams showing the sun to the west of the observer (see below). In this case, it is a fairly small angle that is measured west from the observer’s meridian of longitude to the GHA of the sun. Taken together, these four diagrams give a general idea of how large LHA might be for any particular situation.
 |
 |
|
|
These diagrams show the case in the Northern Hemisphere, where the sun is to the west of the observer’s longitude. In this case, the LHA is fairly small. As always, it is measured west from the meridian of longitude to the GHA. Keep in mind that this will be the case for the sun every afternoon: The LHA will be small, starting at 0° at noon and slowly increasing until sunset. |
||
Let’s try an example. We determine from the Nautical Almanac that the sun’s GHA is 21° and we know that our DR longitude is approximately 150° W. This is roughly the situation shown below. So, let’s plug in the numbers to determine the value for LHA.
LHA is everything in the full circle except for the small angle from the GHA of the sun to our meridian of longitude. That small angle is easily determined (150° minus 40° = 110°). Now, that result is subtracted from 360° to give LHA: 360° minus 110° = 250°. So in this case, the LHA of the sun is 250°.
This does not seem too complicated, but there is an easier way to do this, especially for people who like formulas: If you are in the Western Hemisphere, LHA = GHA minus longitude; if you are in the Eastern Hemisphere: LHA = GHA plus longitude.
Let’s try that last example using the formula. GHA is 40° and longitude is 150° W. We’re in the Western Hemisphere, so we can use the top formula. That would be 40° minus 150°. Unfortunately, LHA may never be negative. GHA needs to be larger for this to work. When dealing with circles, 0° = 360°. As a result, we can add or subtract 360° whenever it is convenient without changing the value of an angle. Here we add 360° to the GHA of 40° and get 400° for GHA.
Now, 400° minus 150° = 250° = LHA. That’s the same answer that we got before, so the two methods are consistent. In fact, they’ll always produce identical answers.
Only whole degrees of LHA
Unfortunately, GHA almost never comes out as a nice, even whole degree. Instead, it has minutes and tenths of minutes as longitude frequently does. Initially, it might seem like this would just require a little extra math, but there is another factor that must be taken into account. The HO 249 sight reduction tables only have listings for whole degrees of LHA. To keep the final answer accurate, LHA must always have an even number of degrees; this means exactly 00.0’. It is tempting to just round off the minutes, but this will make your work essentially useless. In the Western Hemisphere where longitude must be subtracted from the GHA, this requires that the minutes of longitude be the same as the minutes of the GHA.
For example, if GHA = 93° 12.6’ and the DR longitude was 71° 34.6’, your equation might initially look like this:
| GHA
LHA |
93° 12.6’ – west longitude 00.0’ |
The question is, “What number of minutes of longitude when subtracted from 12.6 will equal 00.0?” The answer is 12.6. After we’re finished with this subtraction, the resulting number is no longer called the DR longitude. Instead, we call it the “assumed longitude.” Assumed longitude is very important because it will be used later in plotting, so this step must not be skipped. The assumed longitude should be as close to the DR longitude as possible, so our equation will now be:
| GHA assumed long. (west) LHA |
93° 12.6’ – 71° 12.6’ 22° 00.0’ |
Don’t forget that LHA must always have exactly 00.0 minutes. This is accomplished by changing the DR longitude into the assumed longitude. Your final plot — and therefore your line of position — will not work if you just round this off or try some other shortcut.
In the Eastern Hemisphere, where GHA and longitude are added, the minutes of GHA and assumed longitude should add up to 60.0’. Since 60 minutes of arc equals one degree of arc, you can just add one degree to the LHA and continue. Here’s what an Eastern Hemisphere equation might look like given a GHA of 294° 41.8’ and a DR longitude of 91° 11.3’ E:
| GHA assumed long. (east) LHA |
294° 41.8’ + 91° 18.2’ 386° 00.0’ |
A wrinkle in this case is that we have an LHA that is greater than 360°, which is not possible. But that doesn’t mean we have to throw out our answer. We can simply subtract 360°: 386° – 360° = 26° = LHA
After we determine LHA — and in the process also get our assumed longitude — we need another “assumed” item: assumed latitude. Together, assumed longitude and assumed latitude form something called the “assumed position,” which we will use later in plotting our line of position (LOP).
Assumed latitude
Determining assumed latitude is much easier than the process of calculating assumed longitude. All we need to do is round off our DR latitude to the nearest whole degree.
For example, 40° 12’ N would be rounded off to an assumed latitude of 40° N. A DR latitude of 39° 51’ N would also be rounded off to 40° N assumed latitude.
It is tempting to just round off in your head and not write the assumed latitude down. Avoid this. We need the assumed latitude for two reasons: 1) We need it to enter the HO 249 sight reduction tables, and 2) We need it so we can plot our LOP. If you forget what you went into HO 249 with, you may plot in the wrong place, leading to an incorrect result.
So, a good idea is to make use of a section of your sight reduction worksheet and write down the assumed latitude and the assumed longitude. Then make a box around it and label it “AP” for assumed position. This clearly labeled AP box will come in handy when it’s time to plot your assumed position, which is the first step in plotting your LOP.
In the next installment of our celestial navigation series, we’ll discuss sextants, their sources of error and the necessary corrections needed to sextant sights to make them as accurate as possible.