Editor’s note: We’re revisiting this series on navigating by the sun, moon, planets and stars in the age of GPS because celestial nav is not only a viable backup to satellite navigation, but it is also a skill that ocean voyagers should have in their toolkit. In this series, we’ll cover all the basic knowledge you’ll require to get up to speed on this elegant and rewarding technique for finding your way at sea. Click to read Part 1, Part 2, Part 3, Part 4 and Part 5.
In this installment, we’ll cover time, time zones and the Nautical Almanac.
 |
|
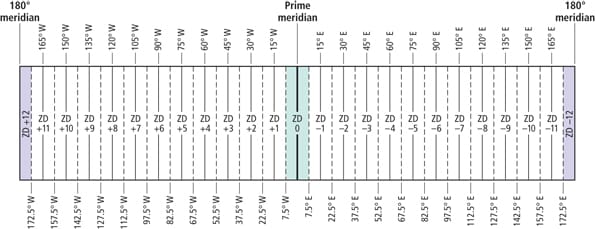
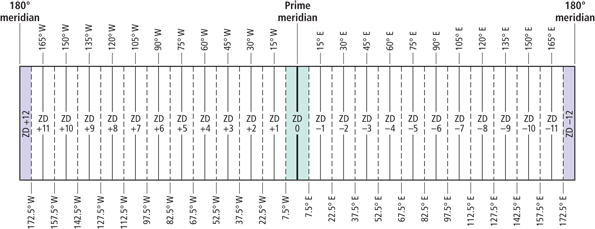
Each time zone has a standard meridian. These occur every 15° from the Greenwich meridian at 0°; 7.5° from the standard meridian on either side is the boundary between that zone and the next. The zone description of the time zone is determined by dividing the longitude by 15°. The result is rounded off to the nearest number. If the longitude is west, then the zone description is labeled +; it is – in the Eastern Hemisphere. A + means the zone description is added to local time to get GMT; it would be subtracted from GMT to get back to local time. |
When taking a sight, you need to know the exact time when the sun just kisses the horizon. Without knowledge of the precise time, your sight reduction will be off and so will your final plotted line of position.
There are several different methods for noting the precise time that you took your sight. Here are the three most commonly used methods. The best is to have an assistant who notes the time from a watch when you say “mark.” Another option is to count the seconds from when you took the sight until you focus on your watch; this should be less than five seconds to avoid mistakes with your cadence. Lastly, you can punch a stopwatch when you take the sight and then compare it with a chronometer at your convenience.
All of these cases assume, of course, that you have a reliable watch aboard that serves as a time standard. The accuracy of sights will not be good if the timepiece is unreliable.
At sea, it is possible to get an accurate update of the time over a high-frequency receiver. Time ticks are available over the radio from the National Institute of Standards and Technology (NIST). The NIST time tick broadcast station WWV is in Ft. Collins, Colo. WWV broadcasts continuously on 2.5, 5, 10, 15 and 20 Mhz for much of the North Atlantic, and from WWVH in Hawaii on 2.5, 5, 10 and 15 Mhz. You can also get time from a GPS receiver. The only wrinkle here is that GPS time and Greenwich Mean Time (GMT) can differ by several seconds. Some GPS receivers automatically correct GPS time to GMT, while some only display GPS time. Check your GPS unit’s manual to determine how it handles this issue.
It makes sense to determine the error of your clock or watch long before departure. Time ticks ashore can be obtained by phone from NIST by calling 303-499-7111 for WWV or 808-335-WWVH. Keep a chart of whether your timepiece gains or loses time (or stays constant). As long as the error is constant (e.g., it gains one second every week), the timepiece is worthwhile. If the error is inconsistent, don’t use that watch.
You should be aware of the error in your timepiece and correct for the error before reducing the sight. If the watch is five seconds fast, subtract five seconds from the time on your watch. If the timepiece is four seconds slow, add four seconds.
The primary use for time in a sight reduction is to enter the Nautical Almanac in order to find GHA and declination. Only one type of time is used there: GMT, Greenwich Mean Time. GMT is also called Universal Time Coordinated (UTC) — different names, but the same time. GMT is based on the sun’s passage over the 0° meridian, which runs through Greenwich, England.
To manage time over the entire globe, by international convention the Earth is split up into 25 time zones: 12 west of Greenwich and 12 east of Greenwich. Each zone is 15 degrees wide. The sun crosses 15 degrees of longitude in an hour (360 divided by 24 is 15). Each zone has a standard meridian and the zone extends 7.5 degrees to either side of the standard meridian. Each zone also has a zone description (ZD), which tells the hours needed to correct to GMT. Always add west zone descriptions to watch time to get GMT; subtract easterly ones. To determine the ZD, divide your DR longitude by 15. If the remainder is greater than 7.5 degrees, you are in the next time zone. Always apply the sign: west is +; east is –.
To reduce confusion, it is easiest to keep the navigation timepiece set to GMT and then the navigator does not need to worry about what time zone in which the vessel is located. This is often difficult because the rest of the crew likes to remain on a local time. One solution is to keep a separate timepiece always set to GMT in the sextant box. Keep in mind that the time in most countries is based on political considerations and, therefore, may differ from the proper zone description.
 |
 |
 |
|
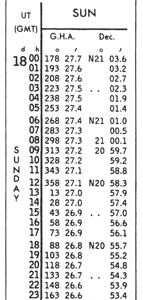
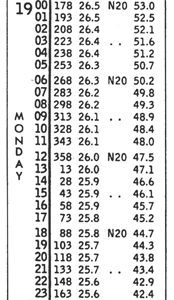
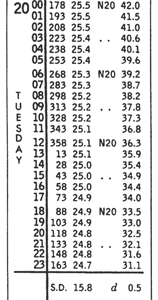
This reproduction from the daily pages of the Nautical Almanac shows the progression of the sun’s GHA and declination each day for three days on an hour-by-hour basis. This would be the first place to stop in the Nautical Almanac when doing sight reduction. Make sure to enter the table with GMT. |
||
Nautical Almanac
The primary purpose of the Nautical Almanac is to provide the Greenwich Hour Angle (GHA) and declination for the sun, moon, four planets and many navigational stars for each second of the year. This information is displayed on the “daily pages” of the almanac, which comprise the bulk of the book.
Each spread of pages contains the information for three days. The left-hand page contains data for stars and planets. Starting at the left, the first column is for Aries, a benchmark used for determining the GHA of stars (more on that in later installments in this series when we discuss reducing star sights). Next come the four navigational planets: Venus, Mars, Jupiter and Saturn. For each of these, the GHA and declination is listed for each hour of the three days. Down at the bottom of each column for GHA is a value for “v.” At the bottom of each declination column is a “d” factor. These need to be taken to the increments and corrections pages to refine GHA and declination. To the right of the information on the planets is a list of 57 commonly used navigational stars. These come with a listing for sidereal hour angle (SHA) and declination (SHA will also be thoroughly described in the series installment on reducing stars).
On the right-hand page is information on the sun and the moon. Just as with the planets, they both have columns of information on GHA and declination listed hour by hour. There is no “v” for the sun. The outside of this page contains information on the rising and setting of the sun and moon. The rising information is on the top of the page and the setting information is on the bottom. Civil and nautical twilight are used primarily for computing the time for shooting stars. At the very bottom of the page, there is information on the equation of time and the meridian passage of the sun and moon, as well as the phase of the moon.
There is a lot more information contained in the Nautical Almanac, however. As we’ve already seen, the inside cover of the almanac contains information for correcting sights.
The next pages of interest to navigators are pages 8 and 9, which detail the positions of the navigational planets through the year. The written description is helpful because it gives a general idea of where to look for the planets. They are so bright that they are fairly easy to identify. The graph is not straightforward; by reading the time of meridian passage off the side of the graph, it is possible to get an idea of whether a certain planet will be up in the morning or evening sky. The diagonal lines provide the planet’s SHA. This is also provided at the bottom of the star column on every daily page.
After the daily pages, there is more important information. This starts with a description of how to use the Nautical Almanac and all of its features. This is a concise description but serves well for jogging one’s memory after a long layoff from using celestial navigation.
On page 268, there is a listing of another 170 or so navigational stars. This gives the navigator a wide variety to shoot. This large listing is most helpful if you’ve taken sights of a star and are unable to identify it using the standard list of the 57 navigational stars. By entering this table with a rough declination and a rough SHA (determined from a sight reduction table), it is possible to determine which star was shot. The magnitude of the stars is also listed here. The star charts are a good general reference for finding a specific navigational star in the middle of the night.
 |
The excerpt from the increments and corrections pages is used to determine the increment for GHA and any “v” or “d” correction. The GHA increment is always added. First go to the box for the proper minute of time (26 here) and then down the seconds column at the far left. Once the correct seconds row is reached, move right to the “SUN” column. The sun also has a d correction. Enter the column labeled “v or d” and move down to the d value from the daily page. Then, move one column to the right to get the correction. This is applied to declination with the same sign as determined for d. |
The Polaris tables are on pages 274 to 276. (Again, we’ll cover shooting and reducing a Polaris sight later in the series.)
After the Polaris tables is a detailed description of the use of a scientific calculator (one with sine and cosine functions) for sight reduction. This provides you with a backup system should you lose your sight reduction tables.
Starting on page 284 is the explanation for the sight reduction tables followed by the tables themselves. These, again, are intended primarily to be used as a backup system. They involve a few more steps than using the HO 249 tables, but the directions are fairly clear if you already have an understanding of sight reduction.
Then there are the pages in the back of the book that are for increments and corrections. This is where the minutes and seconds of time are translated into the change in GHA and declination. The first of these pages is the table for the conversion of arc to time. This is useful for determining the time that it takes the sun to move a certain number of degrees of longitude.
Finally, at the very back of the almanac, there are the sight correction tables for moon sights. This is yet another topic that we will discuss in greater detail later in the series.