Editor’s note: We’re revisiting this series on navigating by the sun, moon, planets and stars in the age of GPS because celestial nav is not only a viable backup to satellite navigation, but it is also a skill that ocean voyagers should have in their toolkit. In this series, we’ll cover all the basic knowledge you’ll require to get up to speed on this elegant and rewarding technique for finding your way at sea. Click to read Part 1, Part 2, Part 3, Part 4, Part 5 and Part 6.
In this installment, we’ll cover the HO 249 sight reduction tables and how to plot a line of position (LOP).
 |
|
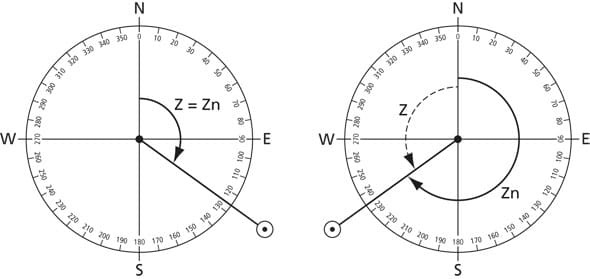
The left diagram shows the sun in the morning when it would have a bearing east of south. In that case, Zn = Z. In the right-hand diagram, the sun is to the west of south as it would be in the afternoon. There, Z measures the angle from north to the west. The sun’s bearing, Zn, will equal 360° minus Z because bearings are always measured from north through east and south. LHA will always be greater than 180° in the morning with the sun to the east, and less than 180° in the afternoon starting at 0° at noon. |
In the previous installment of this series, we looked at how time zones work and how we found Greenwich Mean Time to go into the Nautical Almanac and find the position of the sun for the exact time when we took our sight. In the Nautical Almanac, we find the GHA and declination of the sun. Now we need to use that exact position to find our line of position. And to do that, we need to go to the HO 249 sight reduction tables. (Even though the sight reduction tables are no longer published by the Hydrographic Office, they are still popularly referred to using the “HO” designation.)
The sight reduction table is entered with three numbers andshould yield two numbers. In order to enter the sight reduction table, HO 249, three numbers are needed: 1) assumed latitude, 2) declination and 3) local hour angle (LHA). At the end of the process, you will have two numbers: Hc and Zn. Assumed latitude is just the DR latitude rounded off to the nearest degree. Declination comes from the Nautical Almanac. LHA is a combination of GHA and the assumed longitude. LHA must have exactly 00.0 minutes.
To find LHA in the Western Hemisphere, the formula for LHA is GHA minus assumed longitude. In the Eastern Hemisphere, the formula is GHA plus assumed longitude.
Try this sample problem for LHA: The GHA of the sun is 352° 16.1’ and the DR longitude is 41° 28.4’ W. What is the LHA?
Plug in the formula: LHA = GHA – assumed longitude. Here the DR longitude must be changed to an assumed longitude so that the LHA has zero minutes:
| GHA assumed long. LHA |
352° 16.1’ – 41° 16.1’ 311° 00.0’ |
 |
|
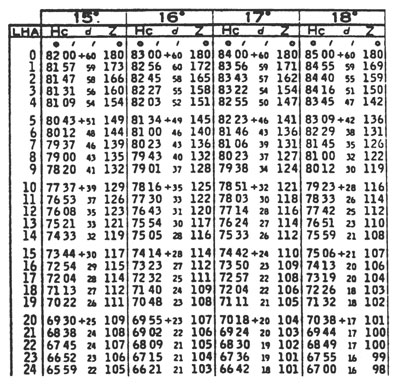
This excerpt from HO 249 is from a page for 23° with a headline of “DECLINATION (15° – 29°) SAME NAME AS LATITUDE.” |
Once you have assumed latitude, declination and LHA, enter the tables. First, turn to a page with the correct assumed latitude. This is printed in bold numbers on the corner of each page. After turning the tables sideways so that you can read them, make sure that you are on a page for the correct declination.
At the top of the page will be a heading describing declination. The top heading here describes a declination between 0° and 14°. The second heading would be on a page for 15° to 29° declination. It is not enough to be on a page for the correct number of degrees of declination. Notice in those headings how one has “SAME” and the other has “CONTRARY” printed after the declination numbers.
This refers to the “north” or “south” designation of two bits of information: declination and latitude. If they are both north or if they are both south, then use a “same” page. If they are in opposite hemispheres, then use a “contrary” page.
At this stage, there is only one final entering argument to use: LHA. The LHA values less than 180° are found on the far left column; the values greater than 180° are found to the far right. Move across on this LHA row until it intersects with the column for the degrees of declination.
There are three numbers that need to be taken from this page: Hc, d and Z. These are labeled at the top of the column. Before leaving this page, convert Z (the azimuth angle) to Zn, the bearing to the sun. The formula for this is on every page in the body of the tables. One check on yourself here is to ask whether your answer for Zn makes sense: In the morning, the Zn should be east of south; in the afternoon, the Zn should be west of south.
 |
|
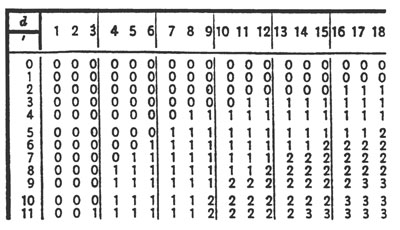
Table 5 is entered with the minutes of declination down the side and d along the top. The correction is applied to Hc with the sign of the d picked up from the main sight reduction page. |
So, for example, if LHA is 49° and the Z from the table is 119°, then use the formula Zn = 360° – 119° = 241°. If the LHA was 311°, then Zn = Z =119°. Zn is one of the two numbers that you need to exit the tables. The other is the final Hc. (In celestial navigation, the term H is used to designate altitude of the body or its angle above the horizon. We found the altitude with our sextant and we called that Ho, or altitude observed. This is Hc, or altitude calculated. This is the altitude the sight reduction tables have calculated based on the assumed position.)
The Hc from the body of the table needs to be modified to take into account the minutes of declination. The main table only gives the Hc for the whole degree of declination, yet we took the time to correct declination down to its minutes value. It turns out that there is a special table for finding this correction to Hc. It is Table 5, on the next to last page of the tables. Enter Table 5 with d and the minutes of declination. The intersection of d and minutes of declination is a correction to be applied to Hc. The correction is positive or negative based on the sign of d. The correction is in minutes. This yields the final Hc.
Correcting Hc
There is only one step before plotting, and that is determining the intercept — described below.
Sample problem: Given an assumed latitude of 23° N, a declination of 18° 10.1’ N and an LHA of 21°, determine Zn and Hc. (The appropriate parts of HO 249 and Table 5 are reprinted above.)
First find Hc, d and Z. Hc = 69° 44’; d = +17; and Z = 100°. Because LHA is less than 180°, Zn = 360° – Z, or: 360° – 100° = 260°. Now take the minutes of declination and d to Table 5 to find the correction to Hc. Our d is 17, so run along the top to 17 and follow that column down to the row for 10’ of declination. Just round the tenths of minutes of declination off to the nearest minute. Here, the result is 3’. That is added to Hc because d is positive:
| Hc d correction Hc |
69° 44’ + 3’ 69° 47’ |
The result is Zn = 260°; Hc = 69° 47’.
 |
|
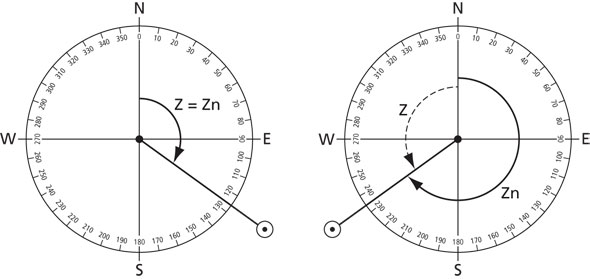
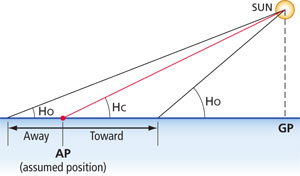
The AP (assumed position) is the position that the Hc is determined from. The Ho is what we observed from our position. If the Ho is larger, then we must be closer to the sun than the AP, so the intercept is toward. |
Determining the intercept
The intercept is just the difference between Ho (our corrected sight) and Hc, which we obtained from the sight reduction tables (and corrected for minutes of declination using Table 5). Subtract the smaller from the larger. Each minute of difference represents a mile on the plot.
The only tricky part is determining whether the resulting number should be plotted toward the sun or away from it. The accompanying diagram shown here should help. There are also a number of mnemonic phrases you can use: CGA means if the Calculated (Hc) is Greater, then plot Away. HoMoTo translates to: If Ho is More (greater), then plot Toward.
Sample problem: Ho is 62° 34.5’ and Hc is 62° 29’. Subtract Hc (which is smaller here) from Ho. The intercept will be plotted toward because Ho is greater than Hc:
| Ho Hc intercept |
62° 34.5’ – 62° 29.0’ 5.5 miles toward |
Plotting the line of position
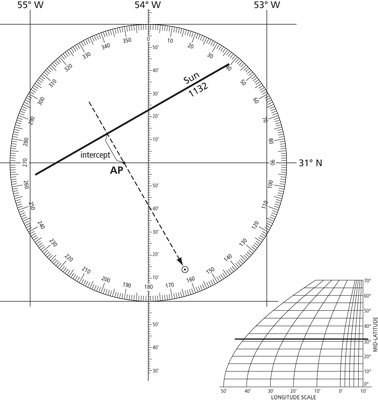
There are four numbers required for plotting a line of position (LOP): 1) assumed latitude, 2) assumed longitude, 3) Zn and 4) the intercept. Before these can be plotted, a plotting sheet must be set up (see our first installment in this series).
 |
|
Plotting the line of position on a universal plotting sheet. |
First, plot the assumed position (AP). This is fairly easy because the assumed latitude is a whole degree and will always be on a printed line of latitude. Remember that the minutes of longitude come from the longitude scale at the bottom of the plotting sheet.
Next, plot the Zn through this AP. The Zn is always in true direction so it can be taken directly from the rose on the plotting sheet. It is helpful to draw an arrow on the Zn line in the direction of the sun.
Starting at the AP, measure the intercept (remember this is in miles and must be taken from the latitude scale) either toward the sun or away from it along the Zn and make a hash mark.
The LOP will be drawn through this hash mark at right angles (90°) to the Zn. This is most easily accomplished by adding 90° to the Zn, finding that on the compass rose and moving it to the intercept hash mark. The LOP must be labeled; customarily, this is with “SUN” and the time.
Sample problem: The accompanying plot used an assumed latitude of 31° N; assumed longitude of 54° 12.1’ W; Zn = 150°; and an intercept of 14.8 miles away.
Set up a plotting sheet (pads of universal plotting sheets are available at most charts dealers) and plot the sample problem.
Click here for a step-by-step breakdown of the entire sight reduction sequence.