At the start of the year, I purchased a 3D printer for my Valiant 40 boat, Ursa, and I’d like to share some of the experiences I’ve had with it.
First the why: I’m based in Mexico right now, where I can get most things I need, but shipping times can be long and expensive, I’m often in the boonies, and there are a lot of projects on the boat that require small, hard-to-find parts. My aim was to be able at the very least to prototype if not create these parts quickly and, in more extreme cases, perhaps make something temporary in an emergency to get me back to port.
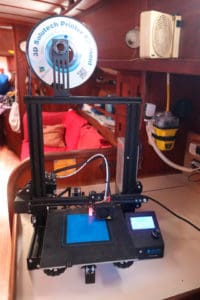
I purchased an Ender 3, which cost around $200, so it was, relatively speaking, a cheap 3D printer. On top of this I use a spare Raspberry Pi, webcam, etc. to run the Octoprint print controller program —which is by no means a requirement of the printer, although it is pretty convenient.
The Ender 3 is a pretty good deal for the money. I chose this primarily because it was affordable and had good reviews, but also because the gantry can be easily detached fully assembled (although I expect repeated disassembly and reassembly will accelerate wear, so it does stay out a lot, usually until I’m making a passage). It doesn’t fit conveniently in any of the lockers because of its height but disassembled it’s easy to store pretty much anywhere. The bed size is also generous. It doesn’t have auto bed-leveling, which means each time I use it I have to do this manually. It’s not hard, but it is tedious. I’ve bought a bed-leveling sensor but haven’t installed it yet.
So far, I’ve had pretty good experience creating and printing parts. There are many things available on Thingiverse, however, to do my own design I’m using Fusion360 (essentially free for non-commercial use) then Cura (also free) to do slicing, then it gets printed in PLA or PET-G depending on the application.
Probably the most ambitious project was to print a sump for the shower. My previous setup had the drain going directly into a diaphragm pump, which invariably clogged, and servicing it was just a royal pain because it was pretty hard to access. I had a small surplus bilge pump, so I designed an enclosure which has a sump, mounts for the pump, a flange to mount it to the shower tray (it’s all covered by a teak grate so installation options are simple), a hose barb which connects to the original 1/2-inch hose which drains into the sink (I plan to move this to discharge overboard directly) and a small grate to keep things like hair out of the sump in the first place. It took about a day to print and cost me probably about $5 in PLA material. I had looked at options for pre-made sumps with integrated pumps, which aren’t expensive, but this one fits exactly how and where I want it and used up components which were in the swap/trade pile.
I use it more for little things. For example, I needed a small cover for a hole that was left when I upgraded my battery monitoring system. It was easy to design and print something that was an exact fit. I made some end caps for some teak legs that hold up my solar panels when I’m at anchor, some covers for sink drains, and some T-pieces I needed for a plumbing job (above the water line, not critical) until I managed to get one at a chandler.
I’ve also printed replacement pulleys for the Genoa and staysail cars which had all failed within a few weeks of each other. For these I still used PLA but printed them with 80% infill, which is pretty much a solid block of plastic. I then put them in boiling water for a few minutes, which increases the adhesion between layers (at a cost of dimensional stability) and then heated up the original bronze bushing and pressed them into the hole, mechanically bonding the bush to the pulley. They work great. I’ll end up getting some metal ones made locally but these are great in the meantime. A replacement car costs around $250 from Defender, and I’m pretty sure the shipping for an off-the-shelf pulley would have been close to the cost of the printer at this stage.
There are, of course, some downsides. The first issue is noise. I can hear the stepper motors in my berth, which can keep me awake. This is a factor because 3D printing isn’t fast. Even if I crank the speed up to double the recommended (fine for simple parts) it can still take two to three days to print big parts. This means you’re going to be listening to the noise a lot.
Second issue is storage. Even disassembled, it still takes up valuable space. Also, I think it’s relatively fragile and ideally it should be stored in some kind of case, which could be stowed in the engine room or somewhere out of the way. And the reel or two of filament I carry also take up room and should be kept clean and dry.
Dimensional stability can be an issue on larger parts, as they are prone to warping. Care needs to be taken to have a uniform temperature. This is easy in the Mexican summer when the onboard temperature is 77° to 86° F all day, but in winter I’ve noticed more distortion with cooler overnights and then warmer temps again when the sun rises. Fancier printers have their own enclosure but are even harder to store.
Other than that, it’s a great tool for the boat. The printed parts aren’t strong enough in tension or shear to make critical parts, but at the same time if you need something urgently to get you home — like a hose joiner, or some awkward-bended fitting, or a plastic clip, it’s just the tool for the job. I can see myself making things like phone and cup holders, tool organizers, etc. I like having it on board, although I expect once some of the projects become tamed on the boat, I’ll hopefully use it less and less.
David Irvine, a software engineer for a tech startup, is currently cruising in the Sea of Cortez.