In a typical cruising boat, life is hard for the batteries. They are often discharged to 50 percent or less of full charge and rarely, if ever, fully recharged. Solar panels and wind generators help, and the engine or generator is run as needed, but typically, this only brings them to an 80 percent charge or so. As this cycle is repeated, a layer of lead sulfate builds up on the battery plates, which reduces the ability of the battery to accept a charge and to efficiently discharge. Another problem that occurs with flooded batteries is stratification, a condition in which the concentration of the battery acid is higher at the bottom of the battery than it is at the top.
As the sulfation or stratification increases, the battery performance steadily declines. The battery will begin to discharge faster and the charging current will taper off much more quickly than when it was new.
Measuring battery capacity
If you have flooded batteries with removable caps, it is relatively simple to test the condition of the battery by fully charging it and measuring the specific gravity of each cell with a hydrometer. If the specific gravity is low or varies between cells, the battery is most likely suffering from stratification or sulfation.
If you have sealed batteries, the only way to test their condition is by load testing. There are two methods of load testing batteries. The first is to apply a short-term, high-current load to the battery and see how much the voltage dips. This will give you some indication of battery condition, but will not provide an accurate measure of the battery’s capacity. The second method is to apply a constant load current until the battery reaches 10.5 volts (for a 12-volt battery), then compare the discharge time to the battery specifications. Most marine batteries specify the battery’s rated capacity in amp-hours at a 20-hour discharge rate. A 100-ah battery should take 20 hours to reach the 10.5 discharge voltage if a load of 100/20 or 5 amps is applied.
 |
|
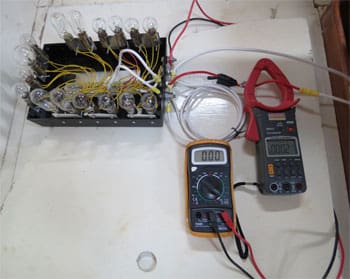
David Lynn |
|
A schematic of David Lynn’s load testing setup. |
Some battery manufacturers provide additional discharge time versus current specifications. For example, if I load one of my Lifeline batteries with a constant 25 amps, it should take 390 minutes for it to discharge to 10.5 volts. The drawback to the second method of load testing is that the battery is rated for only a certain number of charge/discharge cycles. Since this uses up one of them, you don’t want to repeat the test too frequently.
So how do you apply a constant load current? You could buy a commercial load tester, but most of the inexpensive versions are meant to only check the short-term load capacity of the battery. You need one that will apply a constant load to the battery over several hours, and these are quite expensive.
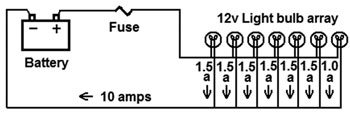
It isn’t hard to make a load tester, however. Small 12-volt light bulbs work quite well. When we started replacing all of our cabin and navigation lights with LEDs, I saved all those old bulbs and sockets. By putting several of them in parallel, I made an effective and inexpensive load tester. Figure 1 shows the wiring diagram for the load tester.
Let’s say you want to load test a 200-ah battery. If you are testing it at the 20-hour discharge rate, the load current you need is 200 ah/20 hours or 10 amps. Each bulb will draw somewhere between 0.5 amps for a low wattage cabin light to 2.5 amps for a navigation lamp. Connect each bulb to 12 volts, measure the current draw for each one, and mark it on the bulb. Wire several sockets in parallel, find a combination of bulbs that add up to 10 amps and plug them in. Measure the current draw for the array of bulbs and add, remove or exchange bulbs until the current draw is correct. Most inexpensive multimeters will measure a maximum of 10 amps DC, so you have to be careful not to exceed this or the internal fuse will blow. I invested in a multimeter that uses clamps to measure DC amps. It measures much higher amperage (up to 600 amps DC), and does so by simply clamping it over the wire rather than having to break the circuit. As the voltage slowly drops, the current will also drop, so it will be necessary to occasionally change the bulb array to maintain the current at 10 amps. When the battery reaches 10.5 volts, record the time and disconnect the load.
The actual battery capacity will be approximately (test time/20)*100. If it took your batteries 10 hours to reach 10.5 volts, the capacity of your battery would be about (10/20)*100, or 50 percent of a new battery. Note: While this approximation is probably close enough for our purposes, it isn’t quite correct. If the battery capacity is significantly reduced, you are not loading it at the 20-hour rate. Depending on the battery chemistry and technology, it would probably be more like 55 percent of the original capacity.
If you can find a specification that provides the discharge time for a higher current load, you can use this increased load to reduce the necessary test time. Since I had the 25-amp discharge time for my batteries, I increased the number of bulbs in the load tester until the current was 25 amps. It took 242 minutes for one of my batteries to discharge to 10.5 volts. The capacity of that battery was approximately (242/390)*100, or 62 percent of its original capacity.
The equalization process
The sulfation and stratification that builds up in batteries can sometimes be removed via a process called equalization or conditioning. In this process, the batteries are brought to full charge, then the charge voltage is increased to a much higher level than usual, typically between 15 and 16 volts, in order to overcome the higher internal resistance caused by the sulfation. To prevent “cooking” the batteries, the current is limited to between 5 percent and 10 percent of the battery’s amp-hour capacity. This voltage is then held for several hours. Most wet cell type batteries can be equalized, as well as some AGM type batteries. Gel type batteries cannot be equalized.
The usual steps involved in equalizing a battery are to fully charge it, then apply the equalization voltage for the time recommended by the manufacturer. The battery should be totally disconnected from other batteries and any other circuits or loads. Most manufacturers provide information as to how often their specific batteries should be equalized and the procedure for doing so. Some recommend monthly equalization, while others recommend it only when the battery becomes symptomatic.
The are several ways to equalize your onboard batteries. Most of these techniques sound good in theory, but I’ve found some of them impractical in practice.
Battery chargers
There are many battery chargers on the market that incorporate an equalization mode, but they don’t always do the job properly. If you are purchasing a new battery charger, talk to a tech support person to make sure it will properly equalize your batteries.
Alternator/voltage regulator
Some alternator and voltage regulator combinations provide an equalization mode. Another option is to use a manually adjustable alternator controller, and continually monitor it for the required time. You must, however, run the engine or DC generator long enough to fully charge the batteries plus the time required for the equalization process. In our case, this means running the engine for 10 to 12 hours! Secondly, unless you have two alternators and regulators, the entire output of the alternator will be used to equalize one battery, and the remaining batteries will not receive any charge.
Wind and solar
If you have a wind generator and/or solar panels, you should be able to equalize a battery on a sunny, windy day. My older bypass charge controller does not allow me to set the output voltage, so I would have to connect the wind generator and solar panels directly to the batteries, resulting in a charge current that varied too much to accurately equalize my batteries. If you have a controller that will properly equalize your batteries and the output of your wind generator and solar panels is adequate, this approach has merit.
Variable DC power supply
Another equalization option is to use a variable DC power supply (PS), which allows you to set the maximum current and/or voltage applied to the battery. This is my preferred method for equalizing batteries. The process I use is as follows: 1) Charge the batteries; 2) Disconnect the battery to be equalized; 3) Adjust max current of PS to the recommended equalization current; 4) Adjust PS voltage to the recommended equalization voltage; 5) Connect to the battery, turn it on and monitor, adjusting the voltage and current as necessary.
Before reconnecting it to the battery bank, it is best to charge the other batteries in the battery bank.
In our case, we have a house bank of four 210-ah batteries. When it is time to equalize them, I disconnect one battery, connect the output of the power supply to it, and plug the power supply into the inverter. If we are at anchor, I am using the three remaining batteries of the bank to equalize the fourth. For an eight-hour equalization process, this will consume around 120-150 ah. If it is a sunny and/or windy day, the solar panels and wind generator will provide most of the equalization current, and I will only have to run the engine an hour or so to replenish the bank. If we are in a marina with shore power, replenishing the battery bank is not an issue. I typically equalize the batteries over a four-day period, equalizing each battery in the bank separately. It takes another three hours to equalize the wet cell starter battery.
If you decide to purchase a DC power supply, you will want to make sure it is rated for at least 20 volts and 15 amps. It should also be output voltage protected. If you connect a DC power supply to a battery and it is not output protected, you will quite likely “fry” the output section of the power supply. I purchased a Volteq model HY3020EX, which is a 30-VDC, 20-amp variable power supply.
I purchased the power supply about six months ago. Before I equalized the batteries, I load tested them and found they ranged from 62 percent to 70 percent of their rated capacities. Then I put them through two equalization cycles and retested each one. This brought them all back to more than 90 percent of their rated capacities. I now try to equalize the batteries at the first symptoms of sulfation.
The cost of the power supply was $225, about one third of the cost of one battery.
—————————–
David and Marcie Lynn have sailed more than 70,000 nautical miles aboard Nine of Cups, their 1986 Liberty 458 cutter.