
Prior to any major passage, I devote a couple of days to checking out the systems aboard Nine of Cups, our Liberty 458 cutter. We’d just completed a tough Indian Ocean passage, and after spending a few months making repairs and seeing the sights, it was time to leave South Africa and begin our crossing of the Atlantic. The engine, prop shaft seal, steering, bilge pumps, nav lights, thru-hulls, windlass and a host of other items were all scrutinized and/or tested, but at the top of the list were the rigging checks.
I divide my rigging checks into two parts – those that are done aloft and those done at deck level. As I’m doing the checks, I make notes in a small notebook, listing everything that can’t be repaired immediately and identifying whether the problem is something that can wait or whether it should be addressed before departing.
General checks
I do a close eyeball check on all the fittings and wire before cleaning the rust — sometimes the rust can point to a problem. Then I clean the fitting with a good metal wax (I like Collinite metal wax) and inspect the part again, looking for any cracks, distortions, worn or stressed parts, elongated holes, missing split pins, loose or missing bolts, etc. — in general, anything that doesn’t look right. I also look closely at the wire for any strands that look cracked or broken. We have Stalock fittings throughout, but if we had swaged fittings I would also check for cracked or swollen fittings. The aluminum mast probably has a hundred stainless screws attached to it, all of which are subject to galvanic corrosion, so I check each of these. A sure sign is bubbling or swollen paint around the screw head.
I usually go straight to the top of the mast and slowly work my way down. I use a bosun’s chair with side pockets and have a separate safety harness on a second halyard as a backup.
Tools
It is always a dilemma in deciding which tools to take up the mast with me. Take too many and it’s hard to find the right one when it is needed. On the other hand, it’s a hassle when I am up the mast and realize I need another tool. My compromise is to take the minimum I’m likely to need and a small line, 60 feet or so, with a weight attached. If I need another tool, I lower the line, then tap on the mast to get Marcie’s attention, and she attaches the tool to the line. Here are the basic tools and supplies I take with me:
• a large and medium sized screwdriver, both flat and Phillips
• large needle-nosed pliers, large pliers and adjustable wrench
• metal polish or wax, rags and spray bottle of water
• pencil and small notebook for taking notes.
Sometimes I also take a small digital camera to document potential problems.
 |
|
Check chainplates where they are exposed above deck for cracks, elongated holes or for water intrusion belowdecks. |
Sailtrack
Our sailtrack fits into a channel on the mast and is riveted in place. I check the track for loose rivets, especially where two sections join. I also clean the track as I work my way down. We often collect a lot of dirt and grime while in a marina. I use a spray bottle of fresh water and a rag — nothing else. I used to use waxes and lubricants, but I found that while they make the track really slick for a short while, they seem to collect more dirt and gum up the track up after a few weeks.
Lights
I check all the lights for corrosion, questionable electrical connections and whether they function. All our mast lights are now sealed LED lights, but when we had non-sealed lights, I opened them all up and checked for corrosion inside. Our tri-color and anchor lights at the top of the mast have an ambient light detector inside, and it is sometimes hard to fool it during the day. It is also difficult to see the LEDs in bright sunlight, so to check that these are working I wait until dark, then turn them on and either check them from the jetty or the dinghy.
Spreaders
I check the welds and the connection to the mast. I look carefully at the ends where the shrouds contact the spreaders — a good place for galvanic corrosion to occur.
Furlers
In addition to the general checks, I check the sheaves for cracks and the halyards for any chafing. If the upper furler bearings bind, the halyard will wrap around the furler so I check that the upper swivels move freely. I check that all shackles are properly seized and that all knots look good.
Masthead
With all the general checks completed, I then check the VHF antenna for corrosion and looseness, and inspect the wiring and coax connector. I check the wind instrument to make sure it turns freely and isn’t damaged, and disconnect the electrical connection to check for corrosion on the pins. I check all the masthead sheaves for burrs and, when possible, check that they turn freely.
The time required for all the checks aloft, including the time it takes to clean all the fittings and the sailtrack, is usually two to three hours for our double spreader rig. That’s a long time to sit in a bosun’s chair. I’m usually a little “stove-up” when I finally extract myself from the climbing gear and try walking again. Make sure you have a comfortable bosun’s chair, wear a hat and have applied lots of sunscreen — and don’t forget to pee before going up.
Mast, shrouds and stays
I first check the mast alignment. It should be straight side-to-side, but may have a slight curve aft towards the top. I check the tension in the stays and shrouds — they should all be tight and there should be minimal or no sag in the forestay and staysail stay. I closely check all the turnbuckles to make sure none are cracked or galled, and that the legs of all the split pins are inboard. I remove the cover over the mast boot and check for cracks or deterioration in it as well as the mast collar. I check all the blocks at the mast base.
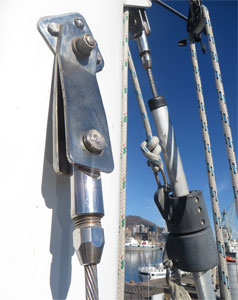 |
|
Check the top swivel of the furler and also mast tangs and wire terminals. |
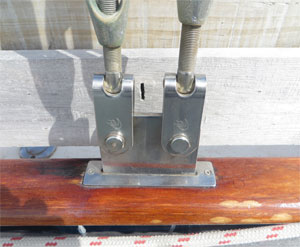
Chain plates
Our chain plates pass through the caprail and are glassed into the hull. Except for the very tops, which are exposed, they are virtually impossible to inspect. I check them closely, looking for any hairline cracks, elongated holes, or signs of moisture that might be making its way downward.
Boom
Like the mast, the boom is aluminum and has a number of stainless screws attached to it, all of which are subject to galvanic corrosion, and I check each of these. A sure sign is bubbling or swollen paint around the screw head. I check the ends, connections, sheaves and welds for corrosion and cracks. I check the outhaul and reefing lines for smooth operation and any signs of chafe. I spend a few minutes examining the gooseneck for cracks and tightness.
Halyards, topping lift, sheets
I check all for chafing, check all fairleads, blocks and sheaves, and check the mainsheet traveler for cracks and general operation. I renew any worn or loose whipping on line ends.
Furlers
I remove the sails and check both furlers for smooth operation, then flush the bearings with fresh water. I inspect the lower swivel, furler drum, etc. for any signs of corrosion, especially around the stainless screws. On our Harken furlers, I loosen and re-tighten each screw, adding Tef-Gel to any that show signs of seizing or corrosion. I check that all shackles are in good shape and properly seized. I check the furling lines for chafe, and inspect the fairleads and blocks.
Rope stoppers, clutches and cleats
I check all for burrs and tightness and check operation of stoppers and clutches.
Tracks and cars
I check all tracks for corrosion, burrs, etc., and check that all cars are secure and move freely.
Whisker and spinnaker poles
I check both ends for cracks, deterioration, and missing or loose rivets or screws. I check the outhaul, topping lift and guys for smooth operation and chafe. I extract and retract the pole to check operation.
 |
|
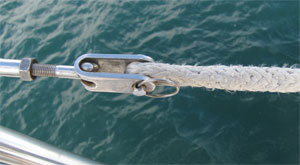
It’s a good idea to also check the lifelines. David Lynn uses Dyneema line rather than wire for lifelines on Nine of Cups. |
Lifelines
Though lifelines are not considered rigging, it makes sense and is convenient to inspect them at the same time as the deck level checks. We have Dyneema (actually Amsteel) lifelines, and really like them. They have two issues, however. First, Dyneema exhibits creep, which means the lifelines need to be re-tensioned every few months. Second, the Dyneema should be replaced every three to five years, due to UV degradation.
So, what did I discover from my recent rigging check? Several small issues were corrected: lifelines re-tensioned; several split rings needed replacing; first port-side reef line was chafed, I was able to remove a few feet from the end and re-use it; a few screws were missing or loose on the stanchion bases; several lines needed re-whipping.
Beyond the small, fixable issues, I also discovered a potential showstopper. The chain plates on the starboard side were showing evidence of water ingress and possible corrosion. The chain plates are stainless steel, which is susceptible to crevice corrosion — a localized form of attack that starts when the metal comes in contact with moisture where there is low oxygen, such as in a crevice.
Since the internal chain plates on Nine of Cups could not be inspected without dismantling the cabinetry in the saloon and grinding away portions of the hull, there was no easy way to determine the level of corrosion. I drilled a small hole in the hull into one of the suspect chain plates, and watched rust-colored, vinegar-smelling water weep from the hole. As painful as it was, we replaced the chain plates before departing.
Though the rigging check is time and labor intensive, we feel it is prudent and provides peace of mind when leaving on a long ocean passage. In our case, it also averted a possible catastrophe offshore.
David Lynn and his wife, Marcie, have lived aboard their Liberty 458 cutter since 2000. They’ve sailed more than 80,000 nautical miles and visited 35+ countries on five continents. They blog at www.justalittlefurther.com and have a website at www.nineofcups.com.