A life raft is a must for any voyager planning to go offshore. While many people invest great effort into choosing the right raft, weighing up considerations such as performance and budget, fewer think ahead to the actual installation. Whether you are buying your first life raft or upgrading to a new one, make sure that proper installation is as high a priority as choice of equipment. With some helpful pointers from our boatyard, we were able to install a new life raft ourselves and now have the peace of mind of a job well done. It is a project of about two days that can be managed with basic tools and know-how.
The small boat conundrum
The ideal place to mount a life raft is on the stern rail, which has the advantage of easy deployment and good attachment points for the painter. However, many smaller monohulls simply lack stern space, especially once a self-steering device and swim ladder have been mounted. The only feasible option on many boats is a horizontally-mounted cradle placed just forward of the dodger. There, the crew still has access to the life raft and the painter can be secured on a deck cleat. The main challenge would be heaving the raft across the lifelines, but given the raised center section of the deck, this should not be a major hurdle.
Any sailor contemplating a bluewater passage should look for the opportunity to actually deploy and enter a life raft. A number of sailing schools offer half-day or weekend safety courses that do exactly this. In our case, we had a used life raft that was impossible to sell, so we could use it for our own simulation. We were careful to notify the marina staff in our location and to use a discrete area lest any passers-by become alarmed. Although a simulation in quiet, in-shore waters is not ideal, it did provide a calm run-through that did not frighten our young son.
What did we learn? To begin with, it took a surprising number of hard jerks on the deployment line to fire the CO2 cylinder and inflate the raft. On the other hand, righting and entering the life raft was relatively straightforward. The strongest crewmember should enter first to help the others in. The boarding ladder can swing awkwardly under the raft as weight is put on it, but the hand-ladder inside the raft gave us the extra grip needed to climb in. We discovered that the raft lurches as each person enters, and were careful to distribute our weight for balance.
The next step‚ — separating from a potentially sinking vessel‚ — proved awkward. For starters, the knife provided in the raft for this purpose was so firmly affixed that it was difficult to free. The painter was difficult to access from the main entry since it attached at the opposite end of the life raft (the idea being to keep the main entry away from breaking seas). We learned that the painter should be accessed through the smaller lookout hatch on the windward side of the raft. Details like these are important and vary between different manufacturers, so it is important to go through your owner's manual carefully.
Finally, we familiarized ourselves with drogue deployment and the survival pack contents. It is possible to have extra equipment (such as a handheld watermaker) packed into the raft on request. Every captain should also prepare a grab bag with further equipment. The first thing to reach for, however, is your EPIRB, which should be tied outside the life raft to transmit your position. Hopefully, you will never have to resort to such measures, but it pays to be prepared.
However, there are a few challenges in installing a life raft in this location. One is that the coach roof is typically a relatively soft section of sandwiched deck. It is not constructed to absorb significant loads, such as a wave sweeping over the deck and pulling at the life raft. A second problem is that most coach roofs have a slightly convex curvature that will not be flush with a straight cradle. Finally, there is the issue of achieving a neat installation without marring the interior cabin ceiling with through-bolts. The approach we used in installing our life raft resolved each of these problems, as described in the steps below.
Installation
In overview, installation consists of four steps: (A) making mounts that will distribute the load of the life raft over the coach roof, (B) preparing the deck for the mounts, (C) fitting the mounts to the deck, and (D) attaching the cradle to the mounts.
Making mounts
The very first step in this process is to determine the exact position for the cradle by placing it in the desired location and marking drill holes. Then determine how thick the coach roof is by carefully probing with a drill at one of the marked mount points. In a sandwich composite construction, the goal is to cut through the top layer of fiberglass and the balsa core, but not all the way through to the interior fiberglass liner. In our case, these two layers of the coach roof were 2 inches thick, and therefore we knew our mounts would be 2 inches tall.
With this preliminary information established, you can begin to prepare four mounts that will support the cradle. These can be made by stacking discs cut from sheet glass to create a mushroom-shaped mount. Eventually, the mounts will be fitted into four wells in the coach roof, establishing solid attachment points for the life raft.
To construct a mount, you will need to stack a number of discs cut from .25-inch structural fiberglass sheet, with a disc diameter of 2.5 inches. The number of discs depends on the thickness of your deck: for example, our 2-inch-thick coach roof called for eight .25-inch discs. Top off the stack with one wider disc (3 inches in diameter) to achieve the mushroom shape. The discs can be cut using a hole saw with 2.5 and 3-inch fittings. The hole saw will also drill a narrow hole through the center of each disc. You will need four mushroom-shaped mounts all together; for a 2-inch-thick mount, that means cutting a total of 32 narrow discs plus four wider tops.
Next, sand each disc with 100-grit sandpaper and then bond each stack of discs with epoxy (such as West System 105 Epoxy Resin with 205 Fast Hardener). To keep the layers aligned, put a temporary bolt through the center holes and tighten against a washer and nut. A layer of plastic wrap can be put around the bolt to prevent it from sticking to any epoxy.
After the epoxy has hardened, sand the rough edges of each mount. An easy way to do this is to put the protruding part of the temporary bolt into an electric drill and let it spin while you hold sandpaper against it. Once the bolt has served its purpose, it can be removed and the hole widened slightly in preparation for the last stage: tapping a 3/8-inch thread into each mount. These will accommodate the stainless steel machine screws that will eventually fix the cradle to the mounts. In our case, the screws were 3/8-inch by 2 inches; a thinner coach roof might take a 3/8-inch by 1.5-inch screw. At the conclusion of the first step, you will have prepared four mushroom-shaped mounts, each with a hole through the center.
 |
 |
 |
 |
 |
|
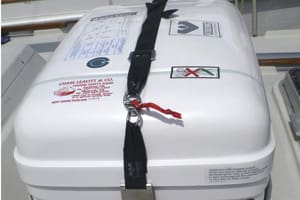
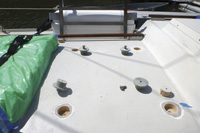
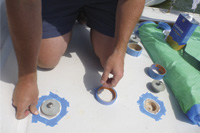
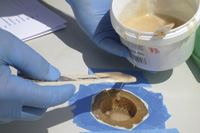
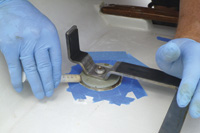
1) The four built-up mounting plugs with the drilled-out mounting wells; 2) masking around the mounting wells to prevent epoxy spills on deck gelcoat; 3) filling the wells with epoxy after coating the plugs with epoxy; 4) filling the gap under the mounting plug lip with epoxy; 5) using bedding compound to fill gaps under the cradle. Raft canister in place on facing page. |
Preparing the deck
The next step is to drill holes (or wells) into the coach roof as counterparts for the cradle mounts. Be careful only to drill to the depth you have determined. Use the same hole saw fitting to cut 2.5-inch-wide wells into the coach roof. To prevent the central drill bit from penetrating the inner liner, readjust it so that it is flush with the hole saw after cutting through the first quarter-inch of fiberglass and wood.
Once you've made the cuts, carefully lever out the fiberglass/balsa plugs. All that remains now in terms of deck preparation is to sand and clean the inside walls of each well. Make sure the wells are completely dry. You must also sand the surface of the coach roof a half-inch around each well; that's where the wider head of the mushroom-shaped mount will eventually sit. Check that everything fits by temporarily bolting the four mounts to the cradle and placing it into position. This is the time to remedy any tight spots (either by sanding the mounts or using a Dremel tool to widen the well).
When you are satisfied with the fit, clean all contact surfaces of the wells and mounts with acetone. Then generously mask off the areas around the wells to catch the inevitable epoxy run-off.
Fitting the mounts
In this step of the process, you will fit the mounts into the coach roof wells. Once you begin working with epoxy, things will move quickly, so be sure you have everything at hand. At this point, the mounts should still be temporarily fitted to the cradle, so you will be handling the cradle as a whole.
It is important to protect the bolts running through the center of each mount from epoxy overflow, because they will be removed one more time before installation is complete. Stuff the lower end of the bolt holes with a small amount of plastic wrap and place a small piece of masking tape over the top of each bolt. This will prevent epoxy from being squeezed up through the hole and sticking to the bolt.
Now you are ready to connect the matching pieces in earnest. Mix a batch of epoxy (such as West System 105 Epoxy Resin with 205 Fast Hardener). Cover both contact surfaces with a layer of clear epoxy: first, all surfaces of the mounts, and second, the insides of the wells (including the extra half-inch ring around the top of each well). Once these sections have a layer of epoxy, add some adhesive filler to the same batch of epoxy (such as West System 406) and partially fill each well with the thickened mixture. This epoxy will fill any void beneath the mounts and will be squeezed up along the walls of each well. Use enough epoxy for some to be squeezed out the top when the mounts are pushed into place. Now place the cradle with its protruding mounts into position and press firmly. Then weigh the cradle down until the epoxy starts to set (for example, by standing on the cradle or putting the life raft on the cradle).
A curved coach roof will still have a small gap between the underside of the flat mount top and the downward curving deck. Use a surgical syringe (50-ml size works best) to apply thickened epoxy into these gaps. Then trim any excess epoxy from the top edge of the mounts. We use out-of-date credit cards or other plastic cards for this purpose; they have just the right stiffness and their corners can be trimmed to the right radius.
After the epoxy has dried, you can complete this step of the installation by painting the mounts so that they match the coach roof. To do so, unbolt the cradle from the mounts and move it aside. Use a soft disc sander to fair the exposed epoxy around the top of the mounts and follow up by hand, using 220-grit sandpaper. This prepares the surface for painting: ideally, use two coats of a two-part polyurethane paint (such as Awlgrip), mixed to match the color of the deck.
Bedding the cradle
Once the paint is completely dry, you can move on to the final step. Bedding compound can make a mess, so be sure to mask off the area around the wells in addition to the sections of cradle that might get smudged. Carefully clean all contact surfaces (including the bolts) with acetone. Then apply bedding compound (3M 4000 UV works well) to the undersides of the cradle at each mount point and along the length of every bolt. Excess bedding compound will be squeezed out when you screw in the bolts; this can be trimmed away after it has set. The final step will be to remove the masking tape and mount the life raft onto the cradle. Now you can step back and admire a job well done!
Taken step by step, this process requires more patience than expertise. The result is a neat, secure life raft that can stand up to the forces it may be exposed to. It’s unusual to feel so much satisfaction in installing a piece of equipment you hope never to use, but it’s well worth the effort!
————–
Nadine Slavinski and Markus Schweitzer live aboard their 1981 Dufour 35, Namani, with their 8-year-old son, Nicky. They are currently in Panama and heading for the South Pacific. Nadine is the author of Lesson Plans Ahoy: Hands-On Learning for Sailing Children and Home Schooling Sailors (visit www.sailkidsed.net). They were assisted in this installation by Yankee Marina in Yarmouth, Maine.