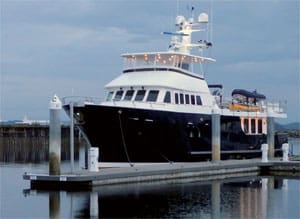
The battery bank on your trawler is the foundation for your ship’s electrical system and is equally important at rest or under way. A reliable source of electricity is easy to maintain if you understand the basics and periodically take some time to ensure your batteries are ship-shape. This article will review some simple, introductory level concepts to review as a refresher and to get you thinking more seriously about batteries to help make sure your 12V system is “dialed-in” and that you remain in charge.
Direct current (DC) 12V batteries come in several sizes and configurations. One thing they all have in common is that they are heavy. Be sure you have marine-grade batteries as there is a difference — more robust construction since they are expected to be shaken around under way, but primarily more accepting of deeper discharges that are more common on boats and designed for regular recharging.
Three chemistry types
The three basic chemistry types are wet cell (flooded), gel cell and absorbed glass mat (AGM). Lithium-ion is another story and not commonly embraced by the boating world … yet.
 |
|
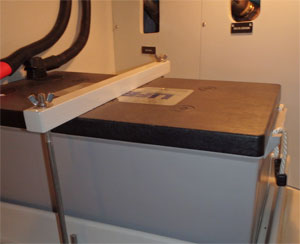
An absorbed glass mat (AGM) battery secured by a hold down bar so it can’t shift at sea. |
You have both a house bank and starting batteries to look after. Most modern trawlers are outfitted with AGM technology because they require less maintenance and are more forgiving, but they are also more expensive and typically require a smart charger/voltage regulator set up. One of the first things you should confirm is what type of batteries are installed on your trawler.
You also need to know where every battery is located on board and how they are connected. Many boatbuilders use the weight as a trim advantage and often batteries are installed low or outboard and difficult to access. It is not uncommon for batteries to be tucked away out of sight, making them less likely to benefit from regular inspections. This can be particularly problematic if you have flooded batteries, which require regular topping off with distilled water. If you have a choice and enough cable, it is better to have the terminals inboard for easier inspection and cleaning.
 |
|
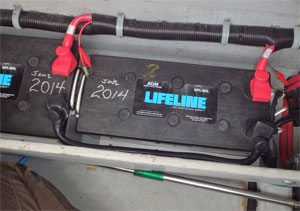
Remember to mark the installation date when replacing batteries. |
Inspecting your batteries needs to become part of your regular maintenance routine. Keep them clean by wiping down with a soft cloth and look for cracks or bulges in the cases. Your battery terminals (positive and negative) should have rubber boots to isolate them. Your terminals should be viewed periodically to make sure the cables are properly connected. Lift up the boots to look for corrosion. If you see crud developing, disconnect the cables and clean off the posts using a wire brush and a baking soda/water paste (turn off power using the master disconnect switch before cleaning). Finish off with some sandpaper then wipe clean and dry. Finally, apply some petroleum jelly (like Vaseline) to the clean terminals. Tighten the cables to the terminals and confirm you have a snug connection — don’t use wing nuts to secure cable ends as they can loosen. Use hex nuts and lock washers. Once things are clean and tight, give one last tug to make sure the cables are firm.
Protective gear
It’s a good practice to wear protective goggles and nitrile gloves when working around batteries. You also need to make sure your batteries are secured in place, either with threaded rods and a crossbar or in a specially fabricated battery box with a securing strap so that they will not jostle in place when your boat is underway.
 |
|
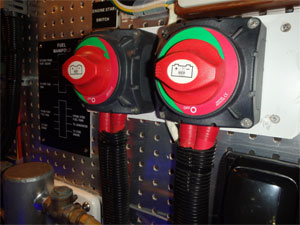
Make sure your battery selector switches are set properly for the situation, whether it be charging the house bank or the engine start batteries. |
Batteries have a limited life cycle and you can extend that by monitoring the voltage levels and keeping them fully charged. In general terms, at an average 80-degree temperature, a 12-volt battery will be fully charged at approximately 12.7 volts for a wet cell, 13.8 volts for a gel cell and 14.4 volts for AGM. Most trawlers make charging voltage easy to track via an analog or digital battery monitor gauge typically installed as part of the electrical panel in the pilothouse. As a rule of thumb, if you get a reading below 12 volts you may be more than 50 percent discharged and it is time to re-charge. Try not to let your voltage drop below 50 percent for better performance and longevity. You can verify the accuracy of your battery voltage meter by confirming the readings from a multi-meter.
There are products that can be installed like the Link Pro battery monitor series, which shows the percentage of voltage remaining in your batteries. This type of display is easier for many boaters to understand than reading an analog or digital voltage level gauge.
 |
|
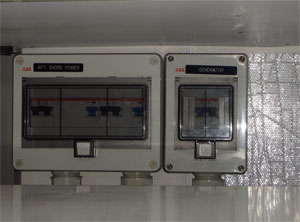
Shore power and generator breaker boxes located in the engine room of a power voyager. |
The average battery will last for a couple of hundred cycles and realistically do a good job for four to five years, but you need to keep them clean and charged. I recommend that you put an installation date label on your batteries and keep the receipts for reference so you know when they are getting near the age of replacement. When one battery goes down it is better to replace all of the batteries in the system with the same type and at the same time — this is a case where one bad apple can spoil the whole bunch. When it is time to change them out, remember they are heavy. A common 8D battery weighs 150 pounds alone. The handles are not always to be trusted (one of my good service tech friends had a handle rip and the battery fell, causing damage to the boat and breaking his ankle) so be careful when repositioning.
Trace the charging circuit
Your engine alternator is designed to charge batteries while you are underway. Depending upon your setup, this may only charge the house bank or may only charge the starting battery. Check your owner’s manual or trace this down so you know how your system is designed. You may also have a parallel switch that will allow you to charge starting and house banks simultaneously. If you have a parallel switch, learn how it works so that if you do have a low battery you can bring it back up to charge.
Most trawlers also have a battery charger (sometimes as part of an inverter) that also helps add voltage. Chargers and alternators do a good job of replenishing the voltage, but a lot also depends upon the number of amps you are using to power various onboard appliances. If you are consuming more amps and reducing voltage faster than you are recharging, you may need to use some energy management techniques like turning off the breakers of non-essential circuits to conserve juice.
Shore power systems are often taken for granted, but it’s a good idea to understand where the breakers are. Land breakers are typically easy to find on the dock shore power tower, but aboard your trawler they may be hidden in a locker. If you trip your onboard shore power circuit breaker you will cut off the dock supply until you reset the breaker (sometimes both shore and onboard need to be reset). Knowing where your onboard shore power circuit breaker is and knowing how to reset it is something you should be familiar with. I like to put a label “UP is ON” on the breaker as a quick reference reminder. Some of the newer shore power cords have light diodes on the connecting ends that illuminate when power is flowing. If your current cord is getting tired and it’s time to upgrade, I recommend looking into this type of cord. Your ship’s electrical panel should have a meter or gauge that shows the voltage coming in. Many inverter panels have a light on the panel that will indicate AC-IN letting you easily confirm that shore power is indeed bringing power into your boat.
One exercise to consider that will help you become more familiar with your electrical loads is to determine what the amperage draw is for each individual breaker on your panel. Pick a quiet time when you are at the dock, your batteries are fully charged and you have shore power coming in. Start by turning all of the breakers off and then selecting one breaker at a time and look at your amperage indicator to determine draw. You will quickly see where your biggest draws are. Be wary of turning off your bilge pump and don’t forget to turn that breaker back on after this exercise.
 |
|
A well-labeled 12-volt DC panel helps in managing battery use. |
Your electrical panel is a collection of breakers selecting equipment to be powered up, and gauges displaying voltage and amperage. Your DC breaker panel is typically supplying power to your nav/com electronics. Some larger trawlers have a dedicated 12V battery and separate charger just for nav/com. Other common 12-volt breakers are; battery charger, cabin lights, refrigerator, 12V round cigarette lighter charging, fans, etc. The back of your breaker panels should be regularly inspected for loose wires and some spare breakers and fuses should be kept aboard for fast replacement when needed.
Take your time and become familiar with what each electrical component does. 12V or DC (direct current) power will only operate a select set of equipment. Items requiring larger electrical loads, like duplex outlets, run off of 120V AC (alternating current) typically supplied through an inverter — the subject of a future article.
Jeff Merrill, CPYB, is the president of Jeff Merrill Yacht Sales — www.JMYS.com. Merrill is active in the cruising community as a public speaker and writer and enjoys spending time at sea with clients. Jeff has written a series of “Dialing-In” your trawler articles for Ocean Navigator and is constantly looking for new ideas to improve and simplify the trawler lifestyle. If you have a suggestion or want to get in touch please e-mail Merrill at: trawlerspecialist@gmail.com.