Editor’s note: Setting up and marking an anchor rode has some wrinkles depending on whether the rode is rope or chain. In this excerpt from his book, Nine of Cups Guide to Anchors and Anchoring, voyager David Lynn writes about how he and his wife Marcie deal with these issues aboard their Liberty 45 cutter Nine of Cups.
All-rope rode is typically three-strand nylon rope, which, by its nature, is very stretchy. Stretch is a good thing in mooring lines and anchor rode, as it adds a lot of elasticity between the boat and the anchor. As the wind gusts and shears, the elasticity of the rope helps prevent the anchor from being jerked out of the seabed. Rope also weighs considerably less than chain, putting less weight forward and making it easier to haul than chain. If your boat and anchor size is small, you may not need a windlass.
An all-rope rode has a few drawbacks, however. One is that it has very little chafe resistance, so as the boat swings, the rope will wear. If you anchor in soft sand or mud, the wear will be gradual, but if the rope encounters a sharp rock or coral head, the rope might well be chafed through in a matter of hours or even minutes. A second drawback is that rope is more likely to get tangled up in the anchor locker, especially after a boisterous sail. Finally, since rope is lightweight, it has very little catenary effect.
All-chain rode
An all-chain rode has a number of advantages. The most obvious one is that it virtually eliminates the possibility of rocks or coral chafing through the rode. Another advantage is the catenary effect that the weight of the chain adds.
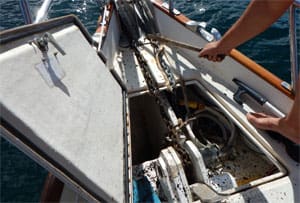
An all-chain rode is unlikely to tangle up in the chain locker, but it does have the annoying habit of forming a vertical pile rather than spreading out evenly. We almost always have to knock the pile down two to three times as the chain is hauled in, especially if we have a lot of chain out.
One disadvantage with an all-chain rode is that chain doesn’t stretch. If the wind becomes strong enough to overcome the catenary effect, an all-chain rode will become taut with a sudden jerk. This creates an enormous stress on the chain, anchor, shackles, bow roller and windlass. It is important to add some elasticity to the chain to prevent it from breaking the anchor loose from the bottom and to reduce the possibility of a catastrophic failure of some component of the ground tackle. Using a nylon line as a snubber will add elasticity to the rode and take the strain off the windlass. Constructing and attaching snubbers is discussed in a later section.
One other obvious disadvantage is the weight the chain adds to the bow. Adding 300 feet (90 m) of chain can easily add 450 pounds forward, which sacrifices performance and increases the tendency to pitch — especially in a light displacement boat. The boat will almost surely require a windlass to haul all that chain up, further increasing the weight forward. Our original windlass was not all that reliable, and we found that while it was possible to haul our anchor manually, it was a tremendous amount of work. As a result, when it wasn’t functioning we were often tempted to stay longer than we should in a place with questionable holding rather than haul the anchor and re-anchor in a better spot. Even if you are a big strong fellow (or lady), it is a slow process to retrieve an all-chain rode by hand, which can be a problem if you need to leave in a hurry.
 |
|
Marking anchor rode with cloth strips worked into three-strand line. |
We were anchored in an open roadstead off Tristan da Cunha, a tiny island in the South Atlantic. The depth of the anchorage was 75 feet (23 m) and we had all 300 feet of chain out. We spent a couple of glorious days there, but on the third day the wind started backing and then increased, putting us on a lee shore. That, of course, was the moment the windlass decided to give it up for good, and by the time I managed to haul all 300 feet of chain and the 110-pound anchor by hand, the waves were breaking over the bow — and me — and Marcie was working the engine hard to keep our boat off the rocks. When we were finally clear and the adrenaline had subsided a bit, I was definitely ready for a hot cuppa, a couple of ibuprofen tablets … and a new windlass.
Combination rope and chain rode
A reasonable compromise is to use chain for part of the rode and rope for the remainder. The chain is shackled to the anchor and then three-strand nylon rope is spliced to the end of the chain. The end of the rope, the bitter end, is secured to a cleat or other strong point on the boat. The chain takes care of most of the chafe issues without adding as much weight as an all-chain rode. If you have a small boat and anchor, you might not need a windlass, but if you do, the gypsy needs to match both the chain size and the diameter of the nylon rope.
So how much chain should you use? The answer is: It depends. If there is too little chain, especially in deeper anchorages, a portion of the rope will lie on the bottom, exposing it to whatever rocks or coral are within swinging range. As you increase the length of chain, you have many of the same benefits of an all-chain rode — with the same disadvantages. A good rule of thumb is to use a length of chain equal to your boat length. A slightly more conservative compromise for most cruisers is to use 70 to 100 feet of chain. If you are heading for the deep anchorages of the South Pacific with all those coral heads, you will want 250 to 300 feet of chain. Add to this enough three-strand nylon line to ensure you have sufficient rode to give you a 6:1 scope in the deepest anchorage you are likely to encounter, and you will be well prepared. On Nine of Cups, our primary anchor has 300 feet of chain and another 200 feet of nylon rode.
Splicing the three-strand line to the end of the chain is a fairly easy splice and maintains about 90 percent of the breaking strength of the original line. With a little practice, you will have a connection that is compatible with the chain gypsy and small enough to pass through the chain pipe.
Marking the anchor rode
Whether you have all rope, all chain or a combination rope/chain, you need to know how much anchor rode has been deployed to ensure you have the correct scope. Some cruisers keep track by counting the seconds as the rode goes out or the rotations of the windlass, but this is a rough approximation at best. Nine of Cups has a chain counter with a digital display that keeps track of how much chain or rope is out — and sometimes it works. Our backup method, which is much more reliable and almost foolproof, is to mark the rode in some fashion, so that the amount of anchor rode deployed is easily determined visually.
Marking rope rode
Marking rope rode is easy. For less than $10, you can buy a set of pre-marked strips of nylon. Each strip of nylon is labeled with the number of feet, usually in some convenient increment — 25 feet, 30 feet or 10 meters. You stretch the line out and weave each nylon strip into the three-strand rope at the appropriate length.
Alternatively, you can cut your own nylon strips in different colors from rolls of ribbon and use a color code to determine the length of rode. We use red, white and blue nylon to mark the number of 25-foot lengths that have been deployed. If you use meters instead of feet, it is simpler to use a color code based on multiples of 10.
 |
|
Using polypropelene line woven into the links as a marking approach. |
Since the following section only applies to the color-coding we use for the number of feet deployed, I’ve omitted metric conversions. Use a similar system for determining the number of meters deployed.
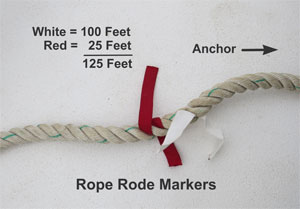
The first strip indicates how many hundred feet are deployed. If it is red, there is less than 100 feet; if white, there is between 100 and 199 feet; and if the first strip is blue, there is between 200 and 299 feet. The second strip indicates how many multiples of 25 feet are deployed. A red strip means 25 feet, a white strip means 50 feet and a blue strip indicates 75 feet. To determine how many feet of rode are out, we look at the first strip to determine how many hundreds of feet are out, then add the number of 25 foot intervals indicated by the second strip.
Here are a few examples: a single white strip would indicate that we had 100 feet of rope deployed; a blue strip followed by a red strip would indicate 225 feet, and a red strip followed by a blue would mean we had 75 feet out. This method works reasonably well for us. It is not entirely foolproof, however. There is always the possibility that a marker might come loose, or that a muddy bottom might make it difficult to discern the colors the next time it is used. Sometimes the arithmetic required to calculate how much rode is out is a stretch for our addled minds after a rough passage. Generally, however, we have a pretty good idea how much rope has been deployed.
Marking chain rode
We have tried several methods for marking chain. We once used different color cable ties. We found that if we didn’t cut the tails off the cable ties after securing them to the chain, they sometimes got jammed in the windlass. If we shortened the tails, the rough cut edge would sometimes chafe the snubber. If we cut the tails flush, there wasn’t enough cable tie to discern the color in less than bright sunlight, and it still had a tendency to chafe the snubber.
We have also painted sections of the chain in different colors, using a color-coding system similar to the one we use for rope rode. This works quite well and lasts a long time, but only if done properly. Normal alkyd and oil-based paints won’t adhere well to galvanized chain. Most spray paints are in this category. Most acrylic latex-based paints, on the other hand, do adhere to galvanized surfaces. Krylon H2O spray paint is the only acrylic latex topcoat paint I know of that comes in a spray can, but is somewhat difficult to find. The alternative is to prime the area to be painted first with a latex-based primer such as KILZ 2 or Zinsser Bullseye 1-2-3. Both are water-based primers that can be over-painted with alkyd or oil-based paints, and the Zinsser product is even available in spray cans.
As before, since the following section only applies to the color-coding we use for the number of feet deployed, I’ve omitted metric conversions. Use a similar system for determining the number of meters deployed.
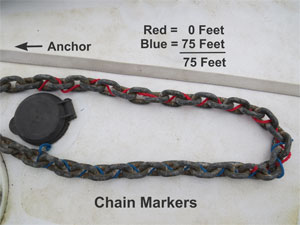
We like to have a mark every 25 feet, starting at 50 feet. We paint a 1.5- foot section of chain for each color. A single white section would indicate 100 feet of chain, a blue section followed by a white section would indicate 250 feet, and a red section followed by a blue section would indicate 75 feet.
When we last had our chain re-galvanized, the paint we had previously applied was removed of course, and we used a different method for marking the chain. We bought 18 feet of quarter inch line in the three basic colors and cut each into three-foot lengths. Our preference is polypropylene line as it is inexpensive, can be found in bright colors and is less likely to become discolored from a muddy bottom, but any type line will work. At each 25-foot segment of the chain, we wove the appropriate line segments through the chain links. We staggered the starting point of each line so we could tell which color was the first digit and which was the second. We initially thought we might have to whip the ends of each line to the chain to keep them from unraveling from the chain, but this has proved unnecessary. We’ve been using the method for two years, and it is now our preferred method.
 |
|
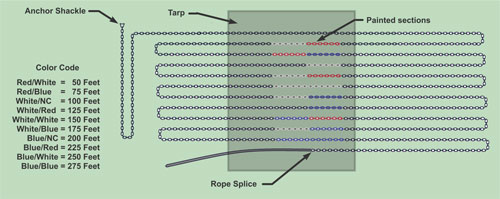
David Lynn’s scheme for painting a chain rode. |
Marking a combination chain/rope rode
On Nine of Cups, we have 300 feet of chain attached to another 200 feet of rope rode. We marked the chain at 25-foot intervals up to 275 feet and know that when we reach the end of the chain we have 300 feet out. The rope rode color-coding starts from zero again, so when we see a red followed by a blue marker, we know we have 300 feet of chain plus 75 feet of rope rode deployed.
If the length of either the chain or the rope rode were ever more than 300 feet, we would repeat the color code. There is little likelihood of confusion — if the color combination white/red appeared, it should be obvious whether the amount of chain/rope deployed was 125 feet or 425 feet.
One key component of using the color-coded visual method is to make sure we have a written record of the color codes used. With our failing memories we find that after we’ve been away from Cups or sitting in a marina for awhile, we can’t remember if red/blue is 75 feet or 175 feet, which definitely makes a big difference when deploying the right amount of scope.
A note about the bitter end
There have been a couple occasions when there was a real possibility of having to leave our primary anchor behind, however, and to do so we would have needed to either disconnect the bitter end or cut the anchor rode. The bitter end of our anchor rode is secured down in the chain locker and is difficult to get to, which left us with the alternative of cutting the anchor rode. With an all-rope rode or a combination of chain and rope, it is easy enough to cut the rode if there is a knife handy. If the boat has an all-chain rode, it is important that the bitter end is accessible or that there is enough rope spliced to the end of the chain to enable it to be cut loose in an emergency. We also keep a small float handy with 50 feet of line attached, which we can tie to the end of the chain. That way, if we do have to leave the anchor behind, we may be able to locate and retrieve it when conditions are better.
David Lynn and his wife, Marcie, have lived aboard their 45-foot 1986 Liberty cutter Nine of Cups since 2000. After departing Kemah, Texas, in May 2000, the Lynns have sailed more than 70,000 nautical miles.