Before we left San Francisco on Active Transport, our Tayana 37 pilothouse cutter, we made quite a few decisions that were based both on prior experience and what we were able to learn from other voyagers. By the end of our voyaging adventure, we had made many changes in the sail plan and sail-handling equipment on our boat.
Some of our choices were driven by gear failures, and others by the differences between our needs for weekend and vacation sailing and the requirements we experienced crossing oceans. Even different parts of the world required different options for the sail plan and sail-handling gear. For example, the west coast of the Americas involves a lot of light air sailing, but once the boat enters the trade winds the game changes a lot. The genoa that helped us in light air sailing was more sail than we needed in the trades.
During our circumnavigation the vast majority of our sailing was downwind, so compromises in upwind performance were acceptable to us (like reefable headsails).
Weekend sailors when we started out, we had little appreciation for the relentless wear and tear that sail-handling gear sees when exposed to 24/7 motion on a small boat at sea.
As our experience grew, so did our confidence in our ability to make our own decisions regarding the appropriate compromises for our boat and our goals. Some of our changes were made with cost and/or the availability of skilled labor in mind, while other decisions were driven by ideas we got by checking out other peoples’ boats. We are big fans of walking down docks and seeing how others have solved the same problems. Most of our better ideas are borrowed.
By the time we completed our circumnavigation, we had become very conservative about the way we sailed the boat on long passages. We learned that it’s not always wise to push the boat — or ourselves — and there were several cases when pushing hard broke gear, and one case where pushing too hard resulted in a ride that was rough enough to crack some ribs (the human kind). The broken gear prolonged the passage and thereby canceled out the benefits of an extra knot of boat speed we got by pushing hard. The cracked ribs made that passage seem a lot longer and made the captain grumpy.
We made our choices work for us, but our solutions are not the best for everyone and every boat. The message we would like to get across is that ocean-crossing sailors need an open mind and should be critical about any solution to a sail control problem, even if the solution is one they came up with themselves.
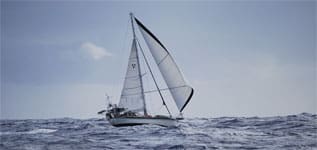
Active Transport is rigged as a staysail cutter with a bowsprit and a long-footed main. We installed roller furlers on both headsails and replaced the yankee jib, which the boat’s designer had intended, with a 110 genoa. That was a decision we came to regret and we swapped the genoa for a yankee about halfway through our adventure.
 |
|
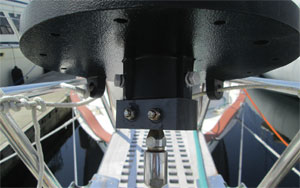
The bottom of the Alado furler on the yankee jib. The turnbuckle can be seen at the bottom and is accessible for adjustments. The entire furler can be lifted an inch or two for inspection of the cable where it enters the Sta-Lok terminal. |
The boat was delivered with a jib boom to allow the staysail to be self-tending when tacking. This was a handy feature when short tacking out the Alameda Estuary in San Francisco Bay, but we considered the boom too dangerous for use at sea. Besides, we tacked fewer times in our circumnavigation than during a typical summer sail on the bay. Eliminating the jib boom also freed up the foredeck for the dinghy.
As delivered, the boat carried a significant weather helm on some points of sail and we made several changes to the rig to ease the heavy helm and make our wind vane’s job easier. The changes to the rig also made the boat faster.
During the first three years after leaving San Francisco, we removed the aft rake of the mast that had been part of the original design. Understanding how this modification would help with our weather helm problem came from insight I gained when I learned to wind surf; but, changing the mast angle on a cruising sailboat involved a lot more than simply leaning the mast one way or the other.
We had to replace the forestays and lengthen the backstay to get adequate adjustment to allow us to move the masthead far enough forward. We ended up with the mast perfectly vertical with just a small amount of pre-bend. The modifications to the forestays required alterations to the sails and furlers. Luffs and furlers had to be shortened.
Eventually we also shortened the foot of the main by 15 inches and that change resulted in a nicely balanced helm.
Let’s look at specific elements of Active Transport’s rig.
The bowsprit
We will never own another boat with a bowsprit.
 |
|
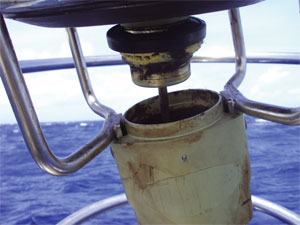
After cleaning up the failure on John Lewis’s yankee jib furler. The entire bearing came free from the base of the furler and the drum and foil jumped up the forestay. Initially there were bearing fragments and a lot of grease wrapped up by the furling line. Lewis had to cut the furling line so they could furl the sail. At the point this photo was taken, Lewis had used a line to hold the drum and foils down so that the foil was not grinding into the top of the forestay. |
The idea behind a bowsprit is that it extends the length of the rig and allows it to carry more canvas. This was an appropriate solution in a day and age when mast heights were much shorter (think gaff-rigged vessels). Today a bowsprit is a historical anachronism that has a lot of disadvantages:
• Anchoring is a pain with a bowsprit. The bobstay gets in the way and if you do not rig a bridal, rather than a single snubber line, you will be awakened by the rode hitting the bobstay. You will also worry a lot about chafe.
• The bowsprit is a weak link in the rigging. The integrity of the bowsprit is critical to the support of the mast because of where the forestay attaches.
• The attachment point of the bobstay to the hull is a difficult thing to build sufficiently strong. A weld on our bobstay attachment fixture broke as we approached Easter Island. The failure was due to a faulty weld in the stainless steel fixture that was not obvious upon visual inspection prior to the failure. There was only one man on Easter Island who knew how to weld stainless and he was on vacation when we arrived with our problem.
• A bowsprit is an expensive vanity when you stay in a marina. On our boat we end up paying for three extra feet of slip space to accommodate the bowsprit. That is expensive air to be renting in places like Australia.
Furlers
We have a love/hate relationship with our furlers.
On one hand, they provide a lot of safety when we can avoid going forward to change sails at night or in rough weather. Being able to reef our headsails eliminated the need for a larger sail inventory. We also like the fact that the sails are stowed on the forestays so we don’t have to deal with bagged sails on deck or below.
The downside of our furlers was that they were responsible for close to 80 percent of our failures at sea and greatly complicated pre-departure inspections.
We installed furlers on both headsails and would probably do the same thing if we were to set off again. We say “probably” because we had enough serious problems with our furlers that hanked-on sails sometimes seem like an attractive idea.
We were constantly tightening or replacing set screws that held the foils together. We learned how to drill new set screw holes and carried the appropriate screws, drills and taps for the job.
 |
|
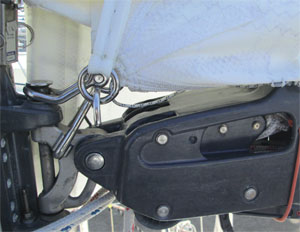
The proper dog bone reef point that was a retrofit installation. The sail was delivered with straps sewn to the sail and with rings that were too small to be grasped securely with gloves on. Lewis found that many things on the boat were better if they were larger. According to Lewis, smaller rings would be strong enough but the larger rings make reefing much easier. |
The most serious problem we had was that one of our furlers suffered a catastrophic failure in the Indian Ocean. The “sealed for life” bearing in the furling drum disintegrated and released the foils from the drum. This allowed the stack of foil sections to slam into the top of the forestay. This was a gear failure that prolonged our crossing of the Agulhas current — not a welcome change of plan.
When we finally got to South Africa and were able to remove the forestay and furler, we found that the top end of the forestay had been damaged by the furler when the failure occurred. We were glad we had exercised the self-control to avoid using our yankee jib following the furler failure.
We eventually replaced the furler for our yankee with a model from Alado, a company in Brazil. Their design eliminates fasteners in the joints between foils, and the furling drum rides above the bottom terminal on the forestay. That facilitates rig adjustments and pre-passage inspections. Also, the halyards are run through sheaves in the terminal block at the top of the furler so there is no halyard from the mast to the sail. This eliminates the risk of halyard wrap.
We found it was necessary to replace the sun cover once during the life of a headsail in the tropics. The worst part of the job is picking the old stitches out.
Whisker pole
We had an extendable aluminum whisker pole that was mounted on a track on the front of the mast. The pole was stowed there when not in use. We never experienced conditions where we felt the need to move the pole down on the deck to reduce windage.
If we had it to do again, we would have a fixed-length pole fabricated and be more concerned with strength than weight. There were very few times when the weight of our whisker pole had any impact on performance in light air. We did, however, break our whisker pole while sailing between New Zealand and Vanuatu. It was the thinner extension part of the pole that broke.
The adjustable feature was of very little use and increased the price and fragility of the pole. Off-the-shelf poles don’t have sufficiently stout mounting points for guys and topping lifts. We ended up using a loop of double-braid line around the pole that was run through a pop riveted pad eye on the pole to keep it from slipping. We attached guy lines and the topping lift to that loop of line.
Running back stays
We replaced the stainless steel cables that were part of our original runners with AmSteel (Dyneema). After six years in the tropics our Amsteel runners still look fine. Amsteel is as strong as stainless, lighter, easier to use and a lot cheaper. We used Garhauer boom vangs for the block and tackle we use to tighten the runners.
 |
|
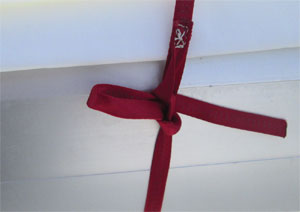
One of Active Transport’s nettles secured the same way Lewis secured the gaskets around the furled sail. One pull on the loose end releases the knot. Note the loop that is sewn in one end of the nettle. This makes it easier to secure the nettles, especially when the boom is outboard. |
We also rigged lines to pull the runners forward and out of the way when they were not in use. We ran those lines to the cockpit using roller furling line blocks on lifeline stanchions. We became big fans of any solutions that kept us from having to leave the cockpit.
We also replaced our lifelines with AmSteel when they started developing meat hooks. We were able to fabricate new lifelines when we were far from the nearest rigging shop. It is becoming more and more common to see cruising boats with AmSteel lifelines rather than traditional stainless. Amsteel is easy to splice. You just have to make sure you sew the splices because the material is so slippery that the splices can slip loose.
Rigid boom vang
We had a rigid boom vang when we left on our cruise and started having problems out of it in the first year. It frequently sheared off the bolts that attached it to the boom.
The vang’s manufacturer made a stainless-steel backup plate for us. We pushed the plate into the boom using our longest batten and sandwiched the boom between the backup plate and the mounting plate on the vang. The backup plate did help. It prolonged the interval between sheared-off bolts.
When we had the rig inspected in New Zealand, the rigger zeroed in on several details based on his experience surveying cruising boats. One detail was the pin that connected the goose neck to the mast. He found that the stainless pin had enlarged the hole through the aluminum goose neck casting. He said this was a common finding on boats with rigid vangs, and he thought it was due to the fact that a rigid vang pushes as well as pulls on the boom and that the constant motion of crossing oceans caused the wear. We were about two and a half years into our cruise by then. Another disadvantage of the rigid vang was that it got in the way of complete rotation of a long winch handle when using the reefing winch under our boom.
We replaced the rigid vang with a traditional four-fall block and tackle vang, and the wear on the goose neck fitting stopped. I doubt we would have ever seen a problem with the rigid vang if we had spent the same years weekend sailing.
Mainsail
We had the boat delivered with a full batten main and have been very pleased with its performance. We wore the original main out and it finally came apart on our second-to-last passage (between Mexico and Hawaii). Sun damage did it in. It was 13 years old and still in adequate shape that I was able to repair it and use it for the balance of that passage.
We almost always put the sail cover on the sail but we used the main a lot when motoring at sea. Even a triple-reefed main was incredibly effective at damping roll at sea.
 |
|
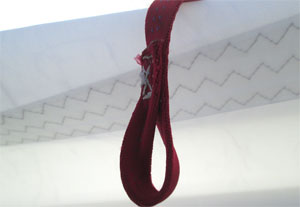
Loop sewn into one end of the nettles on the main. The webbing is twisted before it is sewn down so that the loop will be open when it’s time to thread the other end of the nettle through. |
We also installed a strong track system on the mast and that greatly improved the performance of a full batten main. We were able to easily get the sail up and down, and reef it, in 40 knots downwind. The sail always came down very quickly. Without the strong track, the battens put so much pressure on the sliders in the mast that the sail was difficult to hoist and lower, especially downwind in a stiff breeze.
We did not have lazy jacks. The top of our pilothouse lets us get good access to the entire boom when furling sails, so we have never felt the need for them. If we had a bigger boat or a center cockpit boat where access to much of the boom was difficult, we would probably have lazy jacks.
We used a Scott Boom Lock gybe controller. It worked very well and mounts up against the underside of the boom so it’s much less likely to injure crew than some of the other boom brake devices we looked at that hang well below the boom and have arms that stick out.
Reefing
We have found it is very important that reefing be easy to do, otherwise we find ourselves tempted to put off reefing past the point where it should have been done.
Our original main had three reefs. On every boat we have owned we have had to argue with sailmakers to get the third (very deep) reef added to the main. But we always end up using that reef a lot. We have spent many hours at hull speed with a triple-reefed main and staysail.
Before we had our new main made with a shorter foot, we had to be careful when motorsailing that the upper battens did not chafe against the backstay. We always put at least one reef in the main when motorsailing. The sail works just as well to damp rolling and the chafe at the battens is eliminated.
When we had a new main made, we had the foot shortened and decided that two reefs would be enough as long as the second reef was deep enough. We also decided to try a loose-footed main for our new sail and that feature gives us a lot more control over sail shape. The downside of the loose-footed main is that the sail no longer catches rainwater very well.
The loose-footed main eliminates the need for slots in the foot to accommodate the reefing lines that are tied around the boom. Those slots frequently needed repair where the reefing lines damaged them.
 |
|
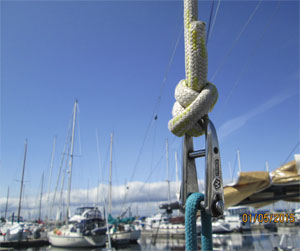
Lewis has decided to no longer use splices in halyards. This halyard knot from the Selden Rigging Guide works fine and does not result in a splice riding on the sheave at the masthead when the sail is fully hoisted. |
Our boom came with internal cars that allowed for single-line reefing but we were unable to take advantage of that feature because the pilothouse on our boat makes leading lines aft impractical.
We removed the cars and used the empty boom to carry a spare batten the same length as the longest one in the sail. We needed the batten. One of the hardest things to get shipped to remote places in the world is a long batten.
To handle the jiffy reefing lines, we installed a 40ST winch that fits perfectly under the boom.
We use the largest line that will fit on the sheaves in our boom for our reefing lines. It is much stronger than needed but easy on the hands and less likely to slip on the reefing winch. We have also found that larger diameter line lasts a lot longer in the tropical sun.
For the nettles that are used to gather up the excess sail when the main is reefed, we used half-inch nylon webbing. I sewed loops in one end of the nettles so we could secure them the same way we secured gaskets on the furled sail. It was much easier to secure the nettles that way than putting in reef knots.
We did not always find it necessary to tie up the excess sail that bunches up when the sail is reefed. Our pilothouse gives us good visibility under the sail even when it’s not too tidy. We did tie up the sail with nettles when we needed to prevent chafe against the boom gallows or when it was raining hard and water filled the bunched-up sail. We later heard that some cruisers install extra grommets to serve as drain holes — that seems like an idea worth borrowing.
Blocks and lines
Over the course of our six years crossing oceans, we have replaced most of the running rigging blocks with Garhauer blocks and have not had a single failure since we did that. We had some early failures of other brands’ blocks that had white nylon sheaves and no ball bearings. We also found that the cheaper nylon sheaves tended to get brittle from sun damage and the edges damage line.
We started out with double-braid polyester lines for all our sheets but eventually changed to a single-braid line for the main sheet. We plan to use single-braid lines for everything as the double-braid sheets wear out.
Single braid is much easier on the hands and coils very easily. The line also takes up less space when stored. The only disadvantage of the single-braid line is that it does not come in different colors.
We will continue to make use of pre-stretched Dacron for halyards.
We have found it a good idea to always add a few extra feet to halyards when we replace them so that we can occasionally cut a foot off the top end. Any worn line that results from the line riding on masthead sheaves can be cut off and discarded. This is especially important for spinnaker halyards where there is a lot of motion on the sheave, but we have shortened the main halyard and jib halyards, too. The whisker pole topping lift also needs shortening on long passages.
We stopped using eye splices for halyards that pass over masthead sheaves. We found a very nice halyard knot in Selden’s rigging guide (www.riggingandsails.com/pdf/selden-tuning.pdf) and now use that knot exclusively for main and jib halyards. The knot is not bulky so the hoist can be just as high as if there was a thimble in an eye splice and has the benefit of it being easy to cut off a bit of halyard from time to time in order to eliminate chafed areas.
When we were weekend sailors we usually used eye splices or a single continuous line for jib sheets. That eliminated knots that could catch on shrouds or the furled staysail when tacking. During our cruising years we started using bowlines to attach the sheets to headsails because that allowed us to end-for-end the sheets when chafe developed at blocks on the genoa track or because of the whisker pole riding on the sheet during long downwind passages.
John Lewis and partner Shawn Maxey circmnavigated aboard their Tayana 37, Active Transport, visitingmore than 20 countries and sailing more than 50,000 miles.